This post may contain affiliate links, please read our disclosure policy.
Make mornings simple with these 3 make-ahead protein smoothies, healthy, delicious, and ready in minutes from your freezer! While this post is sponsored by Florida Dairy Farmers, all opinions, my love of smoothies and the recipes are my own.

My mornings look a lot different now that both kids are in college and we’re officially empty nesters. There’s no more rushing around, packing lunches, or waking up at the crack of dawn to make sure everyone has what they need, it’s just my husband and me. And while that slower pace is wonderful, it also means breakfast often slips through the cracks. Sometimes I don’t feel like making something just for me, so I sip my coffee, dive into my day, and before I know it, it’s almost lunchtime. That’s exactly why I love having these make-ahead protein smoothie packs in the freezer. With just a quick blend, I’ve got a healthy, delicious, and filling breakfast ready in minutes. Whether I want a glow-boosting beauty blend, an energizing pick-me-up, or a refreshing detox option, these smoothies make it easy to start the day off right! Without any extra thought or effort.

I’m all about the whole “without any extra thought or effort” mindset right now. Most weeks I do a little meal prep on Sunday or Monday because honestly, I hate going downstairs and staring into the kitchen wondering what to make, especially when it’s just me at home for breakfast or lunch. If it’s not quick and ready to go, I’ll end up snacking my way through the day on less-than-healthy choices. Cooking a full meal just for myself feels a little silly, which is why I love having a few prepped options on hand. It makes eating well so much easier and helps me stay on track.

Why We Love These Smoothies for Meal Prep
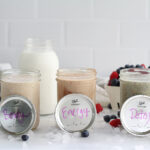
One of the best things about these smoothies is that you can prep the ingredients ahead of time. By freezing the fruit, veggies, and add-ins in individual bags or containers, you cut down on weekday stress, just grab, blend, and go! I like to use mason jars for mine because I can dump everything straight into the blender and then pour it right back into the same jar to enjoy. To make it even easier, I write down on the lid which health benefits each smoothie is geared toward, so there’s zero guesswork in the morning. Prepping in advance also locks in nutrients, reduces waste, and helps me avoid reaching for less healthy options when life gets busy or when I just need an easy meal. Whether you’re after a glowing skin boost, an energy kick, or a refreshing reset, these make-ahead smoothie packs make it simple to fuel your body with good-for-you ingredients any day of the week. Honestly, I could use all three benefits on the daily, so it’s hard for me to pick just one!
Since I’m all about easy meals that still pack in the health benefits, I love knowing that every ingredient in these smoothies has a purpose. They’re not just quick and easy, they each bring their own health benefits too. So, let’s take a look at why these smoothies really give you the boost you’re looking for!

Health Benefits of the Beauty Protein Smoothie Ingredients
Kiwi – Packed with vitamin C (even more than oranges!), kiwi helps support collagen production, which is essential for healthy skin. It’s also rich in fiber for digestion.
Raspberries – These little berries are loaded with antioxidants and vitamin C to protect skin from free radical damage while also promoting a healthy immune system.
Avocado – A healthy fat powerhouse, avocado provides vitamin E and omega-3 fatty acids that keep skin glowing and smooth. It also adds creaminess without needing dairy-heavy thickeners.
Honey – Naturally sweet and soothing, honey also contains trace antioxidants and antibacterial properties.
Whole Milk – Delivers protein, calcium, and vitamin D, which are all important for bone strength and muscle support.
This smoothie is a beauty boost from the inside out! Hydrating, skin-loving, and delicious.
Looking for a couple more beauty smoothie ideas? Check out this Blackberry Beauty Smoothie and this Tropical Skin Glowing Smoothie.

Health Benefits of the Energy Protein Smoothie Ingredients
Banana – A natural source of quick energy thanks to its carbs and potassium, bananas help regulate blood pressure and support muscle recovery.
Rolled Oats – Oats are a slow-digesting carb, which means long-lasting energy and fiber to keep you satisfied.
Peanut Butter (or nut butter of choice) – Provides protein and healthy fats for sustained energy and satiety. Nut butters are also rich in magnesium, which supports muscle and nerve function.
Cocoa Powder – Unsweetened cocoa contains flavonoids, which are antioxidants that may improve blood flow and give a natural mood boost.
Whole Milk – Adds creaminess, protein, and essential nutrients for muscle health.
This smoothie is perfect for powering up your morning or recharging after a workout.

Health Benefits of the Detox Protein Smoothie Ingredients
Spinach – Low in calories but high in iron, folate, and vitamins A, C, and K, spinach supports everything from healthy blood to glowing skin.
Blueberries – Known as one of the top antioxidant-rich foods, blueberries fight inflammation and support brain health.
Apple – A natural source of fiber (especially if you keep the skin on!) and vitamin C, apples help digestion and immunity.
Cucumber – Hydrating and refreshing, cucumbers add water and antioxidants that support detoxification.
Lemon Juice – High in vitamin C and known for its alkalizing effects, lemon brightens the flavor and helps support digestion.
Ginger – A natural anti-inflammatory and digestion aid, ginger gives this smoothie a fresh kick while helping soothe the stomach.
Whole Milk – Provides protein and calcium, balancing the freshness of the veggies and fruit.
This smoothie is light, refreshing, and nourishing, perfect when you want a clean, feel-good reset.

Why Add Protein Powder?
No matter which smoothie you choose, protein powder makes it more satisfying and balanced. Protein helps keep you fuller longer, supports muscle recovery, and gives your body steady energy throughout the day. It also turns your smoothie from just a light snack into a complete meal option. Plus, with so many varieties available (from whey to plant-based) you can pick the one that best fits your lifestyle and preferences. I add the Florida Milk and protein powder right before blending.

Even with a quieter house and slower mornings, these smoothie packs make healthy living effortless. I love knowing I can grab one from the freezer, add my protein powder and milk, and have a nourishing breakfast or post-workout snack ready in minutes, no fuss, no extra thought. Whether I’m looking for a glow-boosting beauty blend, an energy kick, or a refreshing detox, these make-ahead protein smoothies make it easy to fuel my body with good-for-you ingredients. Honestly, I want all three benefits every day, so it’s hard to pick a favorite! But that just means I need to keep them all stocked in my freezer 😉

Alright, let’s make some smoothies, shall we?
Make-Ahead Protein Smoothie Packs – 3 Ways
Ingredients
Beauty Protein Smoothie
- Ingredients to freeze:
- 1 Kiwi sliced
- 1 cup raspberries
- 1/2 avocado peeled and pit removed
- 1 tbsp honey
Energy Protein Smoothie
- Ingredients to freeze:
- 1 banana
- 1/4 cup rolled oats
- 2 tbsp peanut butter or your favorite nut butter
- 1 tbsp cocoa powder
Detox Protein Smoothie
- Ingredients to freeze:
- 1 cup spinach
- 1 cup blueberries
- 1/2 apple sliced
- 1/2 cucumber sliced
- 2 tbsp lemon juice
- 1 tsp fresh or powder ginger
Instructions
- Pour prepped ingredients into your favorite blending device
- Add 1 scoop your favorite protein powder
- Add 1 cup whole milk
- Add ice if desired
- Blend until smooth and enjoy!
Notes
What’s one of your favorite smoothie combinations?
Be sure to check out Florida Milk for more dairy-licious recipes and follow on Instagram, Facebook and Pinterest.
And while you are at it, check out all the recipes on Food Wine Sunshine and follow me on Facebook, Pinterest and Instagram for more FOOD WINE AND SUNSHINE.


