This post may contain affiliate links, please read our disclosure policy.
Smoothie bowls are a healthy and nutritious way to start your day. Smoothie bowls are loaded with vitamins and nutrients to help you feel great. Enjoy this Healthy Citrus Berry Smoothie Bowl recipe.
Healthy Citrus Berry Smoothie Bowl
Have you made a smoothie bowl yet? I shared my first recipe on Instagram a few months ago and I realized that I never published it here on the blog. So, I decided I better fix that.
Smoothie bowls are a fun way to mix in your favorite fruits and vegetables (like a smoothie) but then you get to top them with all your favorite toppings. Adding healthy topping to your smoothie bowl will make it more of a meal and will help keep you fuller longer.
Plus, when I add in delicious granola and some chocolate chips my kids are more likely to eat it…hey momma’s gotta do what momma’s gotta do.
I made this smoothie bowl with a bunch of my favorite Florida produce. I had the incredible opportunity to tour a few of the farms here in Central Florida and what better way to say thank you than by purchasing Florida produce?! Learn more about Florida Agriculture.
For my Healthy Citrus Berry Smoothie Bowl you will need:
Strawberries
Blueberries
Orange
Kale
Non-Fat Plain Greek Yogurt
Skim Milk
Toppings of choice – as you can see, I topped mine with coconut, granola and more fresh berries.
Sounds delicious doesn’t it? Not only does my Healthy Citrus Berry Smoothie Bowl taste amazing, but it is filled with foods that help our immune system.
Smoothie bowls are an easy and healthy addition to your meal plan.
Now, here is my Healthy Citrus Berry Smoothie Bowl recipe. Be sure to print it and pin it so that you can make it again and again.
This healthy smoothie bowl recipe is ready is less than 5 minutes! Made with nutritous fruits and vegetables, this recipe is an excellent way to start your day.
I hope you enjoy this Citrus Berry Smoothie Bowl as much as I do!
As you can see, I used local Florida produce in my recipe, if you don’t have Florida produce available right now, be sure to shop local. Local to your town, local to your state, local to our country.
Have you ever made a smoothie bowl before? What is one of your favorite smoothie bowl toppings?
This post may contain affiliate links, please read our disclosure policy.
This easy breakfast recipe is ready in under 30 minutes! Made with fresh pineapple and apple slices, this healthy and flavorful breakfast idea is a must-try! While this post is sponsored by Healthy Family Project, all opinions and my love for supporting the brands that are supporting my local food banks…are my own!
Easy Skillet Pineapple Apple Pancake
I am always looking out for easy breakfast recipes. Saturday and Sunday mornings are made for relaxing and eating a homemade breakfast, right? Enjoy that cup of coffee, give yourself a few minutes to chat about everyone’s week. Yes please! But what I don’t want to do is spend the whole morning standing in the kitchen cooking.
So, when I saw this Upside Down Apple Pancake recipe over at Healthy Family Project, I decided I needed to give it a try. I put a little spin on it, my daughter loves pineapple so I added pineapple in it too. I mean, how could pineapple and apple be wrong?!
I also switched out the pumpkin spice for cinnamon, simply because I thought cinnamon would pair better with the pineapple.
This was the first time I have ever tried to make a skillet pancake, I have made pancakes in a baking pan though, so I figured this wouldn’t be too different. I will say it was just as easy, but mine didn’t turn out nearly as pretty as the one over at Healthy Family Project 😉
My mistake was once I poured the pancake mix in the skillet, I didn’t make sure the fruit was evenly spaced…it kind of got moved around. So, half of my pancake had a lot more fruit than the other half. But that’s okay, we just topped it with some more fruit 😉
I grabbed my ingredients for my pancake skillet when I was at Publix earlier this week. By purchasing the Del Monte pineapple and the Rainier apples for the pancake skillet, I actually helped support my local food bank.
What?
Yep.
And you can do the same. Now through November 4th look for these brands while shopping at Publix and you will be helping supporting your local food banks too!
You can also look for signs throughout the produce department at Publix. On those signs will also be a QR code that you can scan for healthy and delicious recipes…like that Upside Apple Skillet Pancake recipe that inspired me to make my Pineapple Apple Pancake Skillet. You can also click HERE to get The Healthy Family Cookbook or click the image below.
Again, mine doesn’t look as pretty as theirs, but it tastes pretty darn amazing. In fact, as I was taking pictures of it, my daughter kept begging me to take a slice!
I am happy to report that this Skillet Pineapple Apple Pancake is officially kid-approved! My daughter ate up a slice as her afternoon school snack and promptly stated that there better be enough left for her for tomorrow for breakfast.
She topped hers with a bit of whipped topping and a little extra maple syrup. I ate my slice right out of the skillet 🙂
Skillet Pineapple Apple Pancake Key Ingredients
Pineapple
Apple
Pancake Mix
Water
Maple Syrup
Cinnamon
Butter
Actually, that’s all the ingredients! Easy peasy! And prep time is just a few minutes. You simply melt the butter, cook the apple and pineapple until they are tender, pour in the pancake/water mixture and bake. Done!
Now, here is my Skillet Pineapple Apple Pancake recipe. Be sure to Print It and Pin It so you can make it again and again.
This easy breakfast recipe is prepped in minutes, only has 5 main ingredients and is ready to be served in under 30 minutes! Made with fresh fruit and protein pancake mix, this breakfast recipe is a must-try!
1cupfresh Del Monte Pineapplecut into bite size pieces
3tablespoonsmaple syrup
2tablespoonsbutter
1teaspooncinnamon
1cupwhole grain complete pancake mixI used protein pancake mix
1cupwater
Get Recipe Ingredients
Instructions
Preheat oven to 350F.
Heat oven-safe skillet over medium heat. Add butter and allow it to melt.
Add apples, syrup, and cinnamon to the skillet.
Cook 2-3 minutes, or until bubbly and apples are softened.
Whisk together pancake mix and water in separate bowl.
Pour over fruit in the skillet.
If the fruit moves to one side or another, gently use a spatula to make sure it's evenly spaced or give the skillet a little shake.
Place pan in oven and bake 20 minutes, or until pancake is set.
Remove from oven and let cool 5 minutes.
IF you would like to serve it as an upside down pancake, you can...use a spatula to loosen pancake from skillet. Place large plate over top of skillet and flip to release pancake onto plate. It will taste amazing no matter how you serve it! I promise!
Topping with yogurt or whipped topping if desired.
I hope you enjoy my Skillet Pineapple Apple Pancake as much as we do!
Be sure to check out HealthyFamilyProject.com for more than 500 registered dietitian-approved and family-tested recipes, meal planning tools, grocery store specific campaign details, and healthy tips from real parents and on Instagram, Facebook and Pinterest for even more!
Be sure to look out for those sponsors I mentioned above, YOU can be a part of the reason why 775,000 meals were donated! Do good, feel good, eat good 🙂
This post may contain affiliate links, please read our disclosure policy.
Because all parents and students need help with schoolwork. Learn about Paper. Paper is a free online tutoring service that gives students help where and when they need it. While This post is sponsored by Paper, my need as a parent to offer my children an online resource for help with homework and studies is my own.
Free Tutoring Service In Hillsborough County Florida
Hi, mom of two kids in high school here. Another way to say that is…Mom that doesn’t have the ability to help with homework anymore. And if I’m being honest I haven’t been able to help with homework in YEARS. My son is in pre-calculus. My daughter is in Geometry. So, go ahead and do the math…if my kids are in high school, that means I haven’t done that type of school work in 20+ years…Yeah, that’s all you’re getting there 😉
So, what happens when they come to me with questions about Spanish homework (I don’t speak Spanish, I really wish I did though!) or when they want me to proof their paper for Lit class. Um, well, most of the time I tell them to Google it. Don’t get me wrong, I can read a Lit paper with the best of them, but if you haven’t guessed from my writing, I’m not always 100% grammatically correct.
Do I need to hire tutors to help the kids? No. At least I don’t think so. Both kids are in honors classes with GPAs over 4.0. But that doesn’t mean that they don’t need help. It doesn’t mean that they don’t get homework. It doesn’t mean that they don’t have questions. It doesn’t mean that they both don’t have a subject (or two…or three) that they struggle with. What it means is that when they do need help we have a harder time finding it. Teachers aren’t available 24/7, and they shouldn’t be! They work hard, seriously, I have two really good friends that are teachers and they put their hearts and souls into what they do. Teachers give their students everything they possibly can. And they can’t work 24/7, even though us parents sometimes wish they did. Teachers need a break too…and if anyone deserves one, teachers do!
But sometimes, students need more. Sometimes my kids need help. And as a parent, I just can’t give it to them.
Unless I lived in Hillsborough County.
What?
Well, I live in Pasco County and I am patiently waiting for Paper.
Paper?
Yes, Paper.
What is Paper?
Paper is an online Educational Support System. What does that mean exactly? Students receive unlimited, 24/7 on demand live help from Paper tutors—typically within 15 seconds of requesting it. Tutors deliver homework help, writing feedback and study support. Students are intelligently paired with specialized tutors based on the topic area of inquiry. You read that right, your child could receive help within 15 seconds of asking! So, instead of saying “Google it” you can say “Paper it” and you would feel more confident on the answers your child is receiving. And, your child will actually be getting live help, like from a real person! How amazing is that?!
If you have a child in 6th grade and above in Hillsborough County, your child ALREADY has access to Paper 24 hours a day 7 days a week. There are over 200 Academic topics that are tutored by specialists that can speak four different languages. So, it’s almost a guarantee that no matter what your child has a question about, someone at Paper can help.
Have a question on homework? Ask Paper. Not sure about that Lit paper? Ask Paper to proof it. Worried about that science report? Ask Paper. Think of Paper’s tutors as virtual teaching assistants.
Ok, now the question you all really want to know…how much is Paper? Because, let’s be honest, if we all had the money for a private tutor for our kids, we would totally do it.
Paper is FREE. 100% FREE. It’s paid for by school districts. That means us as parents pay NOTHING.
Where is Paper available?
Well, that kinda goes back to my comment above about Hillsborough County. Paper is available in Hillsborough County Florida right now (as well as many other counties across the US) and I am patiently waiting for it to get approved here in Pasco County. Because like all the other parents out there that are navigating school work again, I need some help for the kids sometimes!
So, if you live in Hillsborough County, check out Paper now! Have the kiddos go online and check them out too. It’s a 100% FREE service to you and your children. Take advantage of it!
This post may contain affiliate links, please read our disclosure policy.
Make some chocolate covered pretzels and chocolate covered marshmallows then add in candy eyes and you have yourself a spooky delicious Halloween Spider. Serve your Halloween Spider on top of Hot Chocolate and you have yourself the ultimate Halloween treat. While this post is sponsored by Florida Dairy Farmers, my love for Halloween treats and hot chocolate are my own.
Halloween is almost here! And to celebrate I have some Halloween Marshmallow Spiders and the easiest hot chocolate recipe you will ever make. Because what better place for your Halloween spiders to hang out than on top of steamy cups of hot chocolate?! In fact, dip those yummy spiders right into the hot chocolate…YUM!
Halloween isn’t just about costumes and scares, it’s the perfect excuse for creative treats! These playful Halloween Marshmallow Spiders perched on mugs of silky easy hot chocolate bring a touch of spooky charm to cozy autumn evenings. They’re super simple to make (kids can help!), and they turn your warm cocoa into a mini Halloween party. Just melt, dip, add candy eyes… and let the spider fun begin!
You guys loved my Halloween Monster Chocolate Chip Cookies so much last year, that I thought this year we would celebrate Halloween again with another sweet treat. Halloween is all about spooky treats after-all 🙂
The sound of Michael Jackson’s Thriller filling the air, pumpkins, candy, and people in costumes, are all signs that Halloween has arrived. Did you know that Halloween traditions began over 2,000 years ago?
The origins of Halloween can be traced back to the New Year celebrations of the Celts 2,000 years ago. November 1st was the beginning of the long, harsh winter. The Celts believed that the night before their New Year blurred the boundary between the land of the living and the souls of the dead.
The Celts thought that malevolent spirits returned for this one night a year in order to create trouble and mischief, to make animals sick and damage the next harvest. At the same time, the Druids, or Celtic priests used the presence of the spirits in order to make predictions to guide them through the coming months.
The Pagan Festival of Samhain
During the festival of Samhain, (meaning “summers end”), as the Celtic New Year’s Eve was called, the Celts would dress themselves in the skins and heads of the animals they had recently killed. They would cull the weak and the old from their herds in an attempt to allow the stronger animals to survive on the meager food that would be available over the winter months.
Huge bonfires were built and they made sacrifices of crops and animals. At the end of the celebration, the Celts would take embers from the bonfire and relight the fires in their homes which had been extinguished earlier in the evening. It was believed that by doing this, the fire created from the embers of the sacred bonfire would offer protection during the winter months.
Feralia, Roman Festival for the Dead
By AD 43 the Romans had extended their empire to include most of the Celtic territories and in time the Roman festivals of Feralia and Pomona combined with the Celtic festival of Samhain. Feralia took place at the end of October when Romans honoured the passing of the dead. Pomona was a festival in honour of Pomona, goddess of fruit and trees.
During the 7th century, Pope Boniface IV moved the feast of All Saints Day from May 13 to November 1. Some critics argued that this was an attempt by the Catholic Church to eradicate the pagan festival of Samhain from the religious calendar. All Saints Day was a day to honour religious saints and martyrs and the celebration became known as All-hallows, All-hallowmas and All-hallows Eve.
During AD 1000, the Church made November 2nd All Souls day. As with previous festivals, this was a day set aside to honor the dead. Festivities included parades, bonfires, dressing up in costumes of saints, angels and devils. The three celebrations of the Eve of All Saints, All Saints and All Souls were collectively called Hallowmas.
As previously mentioned, the tradition of dressing up can be traced back to the Celts and can also be seen in Europe when at a time when people were especially superstitious. They believed that by wearing masks when they left their homes at night the spirits would leave them unmolested, thinking the wearer was from the spirit world and not a living soul. And in an attempt to prevent the malevolence entering the house they would leave bowls of food in an attempt at appeasement outside their doors.
The History of Trick-or-Treating
The modern custom of trick or treating has its origins in a number of practices. An old Irish custom was to go from door to door collecting money, breadcake and food in preparation for the festival of St. Columbkill.
A 9th century practice was called “souling.” On 2nd November, early Christians would walk from village to village begging from soul cakes which were made from bread and currants. The more soul cakes the Christians collected, the more prayers they promised to say in memory of the dead relatives of the donors.
Today, children dress in costumes, and we celebrate with friends and family with fun treats, eats and trick-or-treating.
Speaking of Halloween treats…. What do you know about the official drink of Halloween? The official drink of Halloween is said to have been created over 500 years ago! And it was introduced to Europe over 300 years ago. What is official drink of Halloween that dates back centuries?
Chocolate milk is the Official Drink of Halloween, so be sure to serve nutritious chocolate milk as the ultimate Halloween treat! Warm it up for the easiest hot chocolate you will ever make 😉 Then top it with some whipped topping and one of my chocolate covered Halloween spiders and you’ll have yourself the perfect Halloween sweet treat. And you can feel good about the fact that chocolate milk is calcium rich, has bone building calcium and has 13 essential nutrients.
My Halloween Spiders are insanely delicious….you won’t be able to eat just one. And they are the perfect topping to your Halloween Hot Chocolate.
They are also super cute and a fun way to get the kids to help you in the kitchen. But they can be a bit messy. Like, you are bound to get some chocolate on your fingers. Worst case, you are going to have to lick your fingers 😉
Halloween Marshmallow Spiders Key Ingredients
Melting Chocolates
Coconut Oil
Big Marshmallows
Pretzel Sticks
Candy Eyes
Some Patience
How To Make Chocolate Covered Halloween Marshmallow Spiders
You will want to break the pretzel sticks in half if you would like to have your spiders has shorter legs. I have one big hot chocolate cup, so I left the “spider legs” long for that one. Melt the melting chocolate according to the directions on the package, add in a teaspoon of coconut oil to make it a bit more “liquidy”, this will make it easier to spoon the chocolate over the “legs” and “body” of the spider. Then you will first dip each pretzel stick end into the melted chocolate, then push it into the marshmallow. Once your “spider” has 6-8 legs, set it aside so that it can dry. Once dry, you can spoon the chocolate over the marshmallow and pretzels sticks. I used a fork to hold the marshmallow, but you can use your fingers. Either way, you are going to be chocolate on you somehow, some way, so just go for it 🙂 Once your marshmallow is coated, give your spider some eyes! Allow them to dry before serving them onto top of your Halloween Hot Chocolate.
The kids also had fun making Halloween aliens. They simply dipped the marshmallows into the melting chocolate, gave it some eyes, some sprinkles, then used a pretzel stick (or two) as antennas.
They all turned out so cute! So, no matter how you decorate your spiders or aliens, I promise you, they will be a hit at your Halloween party.
Key Ingredients For The Best Hot Chocolate EVER
Chocolate Milk
Yes, it’s really that simple. What more could you possibly need besides rich, creamy amazing chocolate milk?
How To Make The Easiest Hot Chocolate EVER
Simply pour chocolate milk into a microwave-safe cup and warm it in the microwave on 50% power until warm. Add in some cinnamon if you are feeling fancy. Top with whipped topped and a Halloween chocolate spider. For extra chocolate-y hot chocolate, add in chocolate syrup. Personally, I don’t think you need it though! You can also warm the chocolate milk in a small pot on the stove.
These Halloween Marshmallow Spiders may start as a seasonal treat, but their fun doesn’t have to end on October 31st. Whether you’re curling up for a chilly movie night, hosting a fall gathering, or just want something charmingly playful, this adorable topping makes any hot chocolate instantly festive. Easy to customize, utterly adorable, and always a favorite with both kids and grown-ups!
Now, here’s how to make your spooky Halloween spiders and easy hot chocolate. Be sure to Print It and Pin It so that you can make them every Halloween season.
Halloween Marshmallow Spiders + Easy Hot Chocolate
Make some chocolate covered pretzels and chocolate covered marshmallows then add in candy eyes and you have yourself a spooky delicious Halloween Spider. Serve your Halloween Spider on top of Hot Chocolate and you have yourself the ultimate Halloween treat!
Course: Dessert, Dessert/Snack
Keyword: chocolate, halloween
Author: Tracy
Equipment
Microwave
Ingredients
Melting Chocolatesvarious colors
Coconut Oil
Big Marshmallows
Pretzel Sticks
Candy Eyes
Sprinkles
Hot Chocolate
Florida Chocolate Milk6-8 oz per glass of hot chocolate
Get Recipe Ingredients
Instructions
Break the pretzel sticks in half if you would like to have your spiders has shorter legs. I have one big hot chocolate cup, so I left the "spider legs" long for that one.
Melt the melting chocolate according to the directions on the package, add in a teaspoon of coconut oil to make it a bit more "liquidy", this will make it easier to spoon the chocolate over the "legs" and "body" of the spider.
Dip each pretzel stick end into the melted chocolate, then push it into the marshmallow. You aren't covering the whole pretzel at this time, just enough to push it into the marshmallow. The chocolate helps the legs stay in.
Once your "spider" has 6-8 legs, set it aside so that it can dry. Once dry, you can spoon the chocolate over the marshmallow and pretzels sticks. I used a fork to hold the marshmallow, but you can use your fingers. To use a fork, place the marshmallow on the prongs of the fork.
You may have to use the back on the spoon to smooth the chocolate over the whole spider. Don't worry, it doesn't have to be perfect!
Once your marshmallow and pretzel legs is coated give your spider some eyes! We added 3 eyes, we felt that was spookier 🙂
Top with sprinkles if desired.
Allow them to dry before serving them onto top of your Halloween Hot Chocolate.
Easy Hot Chocolate
Warm Chocolate Milk in microwave at 50% power or on stove.
Top with whipped topping.
Top with Halloween Spider.
Enjoy!
Notes
My kiddos took the marshmallows and dipped them into the melting chocolate and made little Halloween Monsters and Aliens too! Simply add eyes and make antennas with the pretzels.Have some fun with these!This is a great way to get the kids in the kitchen having some Halloween fun too!
I hope you enjoy these Halloween Spiders and Hot Chocolate as much as we do!
And while you are at it, check out all the recipes on Food Wine Sunshine and follow on me Facebook, Twitter, Pinterest and Instagram for more FOOD WINE AND SUNSHINE.
This post may contain affiliate links, please read our disclosure policy.
This Creamy Chicken and Caramelized Onions recipe is made in one pan, prepped in minutes and is ready in under an hour. Grab the recipe and learn more about the health benefits of onions. While this post is sponsored by Shuman Farms, all opinions and the recipe are my own.
Creamy Chicken and Caramelized Onions Skillet
A little over 3 years ago I was sitting in my daughter’s 6th grade End Of Year performance at her school when I got a phone call. I didn’t recognize the number, so I sent it to voicemail. In between events, I stepped out and listened to the voicemail, it was from the doctor’s office telling me that I needed to come back in for another mammogram because the one I just had showed an irregular mass of tissue.
I cried. Oh my goodness did I cry. I took a deep breath and walked back into the school gym. I sat through my daughter’s performance holding my husband’s hand trying to hold back my tears.
The prior year I had two surgeries to have skin cancer removed from the inside of my ear (the most painful surgery of my life and I am the mother of 2 kids) and one on my forehead. I was so scared.
I scheduled my follow up appointment as soon as we got home. I sat through the follow-up appointment, got the additional scans, and cried the whole time.
Thank God my results came back normal, it was just a tissue mass.
I was so scared.
I consider myself lucky.
Did you know that about 1 in 8 U.S. women will develop invasive breast cancer over the course of her lifetime? 1 in 8.
Ladies, I can not express enough how important it is to get your annual breast exams. Self check regularly.
Care for yourself. Care for your tatas. Not just in October, because it’s Breast Cancer Awareness Month, but all the time. Let October serve as a reminder for you, yes, but don’t let it be the only time you think about self-care. About you. About reducing your risk of getting breast cancer. About increasing your survival rate if you did get diagnosed with breast cancer because you caught it early thanks to a self-exam or a mammogram.
Onions are one of the foods that have cancer-fighting nutrients. Actually, in India, onions were used for their medicinal properties as early as the 6th century. From Greek to Roman times, all through the Middle Ages, onions were a such an important food, that people paid their rent with them or presented them them as gifts.
Health Benefits Of Onions
Coming in a variety of colors that range from translucent white to pale green, yellow and red, onions are not only colorful and tasty, they are also said to have many health benefits. Like garlic, which is said to have cancer-fighting properties, onions belong to the Allium family. Their rich in sulfur-containing compounds are responsible not only for their pungent smell, but also for many of their beneficial effects.
Onions can help boost bone health. With an increased risk of developing osteoporosis due to decalcification of the bones, the consumption of onions may be especially beneficial for women, especially during menopause.
With their anti-inflammatory properties, onions are also helpful in reducing the symptoms associated with the swelling caused by rheumatoid arthritis, allergic responses to asthma, and respiratory congestion. Together with chicken soup, onion soup can be very helpful alleviating congested respiratory passages caused by a common cold.
Cancer Fighting Antioxidants Found In Sweet Onions
Sweet onions are an excellent source of quercetin and allicin.
Blood Sugar-Lowering Effects Of Onions
Because onions are rich in chromium, a trace mineral that helps the cells’ response to insulin, it is said that they have lowering effects in the blood sugar levels.
A clinical study of diabetics showed that chromium can improve glucose tolerance and decrease “bad” cholesterol levels while increasing “good” (HDL) cholesterol levels. Consuming refined sugars, white bread and lack of exercise conspire to lower chromium levels. A cup of raw onions contains more than 20 percent the daily value of this important mineral.
Cardiovascular Benefits of Onions
As with garlic, the regular consumption of onions can reduce cholesterol levels and lower blood pressure, which help in the prevention of atherosclerosis, diabetic heart disease and strokes.
During a study conducted with more than 100,000 people, it was the ones with diets rich in onions, broccoli, apples and tea (the richest source of flavonoids) who showed a 20 percent reduction in the risk of heart disease.
Ovarian and Breast Cancer Prevention
It has been shown that the women who include onions, broccoli, blueberries, spinach, kale and black tea in their diets (all of these kaempferol and flavonoid rich foods) reduced their risk of getting breast and ovarian cancer.
So, let’s eat some onions shall we?! And not just any onions, look for Shuman Farms Sweet Onions this month and every month. But this month, look for the pink RealSweet onion bags.
For the past 13 years, Shuman Farms has distributed special, pink RealSweet onion bags and display bins to support breast cancer awareness. Since 2009, they have donated more than $110,000 to organizations working hard to find a cure. This year, they are be honoring those impacted by the disease while working to educate consumers on the cancer-fighting nutrients found in sweet onions.
So, today I am celebrating my regularly scheduled mammograms with an amazing recipe that is filled with delicious sweet onions. So, make it, enjoy it with your family, share the recipe with your friends and family, and know that you are helping raise breast cancer awareness and you are helping save the tatas.
Creamy Chicken and Caramelized Onions Skillet Key Ingredients
Cook the chicken, using the same skillet so they get all that delicious flavor from the onions.
Add the broth, milk, some seasonings.
Done baby!
My son requested a baked potato, then he opened it and piled the chicken and onions on top of it. It was so good! My daughter asked for pasta with hers. Also SO good! Me, I just ate it exactly the way it was and had a side salad.
No matter how you decide to serve your Creamy Chicken and Caramelized Onions, I promise, you’ll love it! The caramelized onions add so much flavor that you really don’t need any other flavors going on…just that little bit of salt and pepper.
Now, here’s my Creamy Chicken and Caramelized Onions recipe, be sure to Print It and Pin It so that you can make it again and again.
I hope you enjoy this Creamy Chicken and Caramelized Onions Skillet as much as we do. And don’t forget to schedule your annual breast exam and self-check for lumps regularly!
This post may contain affiliate links, please read our disclosure policy.
Looking for the perfect martini to celebrate a special occasion? Or just to celebrate TODAY? Then this Pink Diamond martini is it! Ready in just 2 minutes, it’s made with CK Mondavi & Family Pinot Grigio, vodka and fresh pummelo juice. Cheers! I am a proud CK Mondavi and Family Ambassador, while this post is sponsored, all opinions and the recipe are my own.
Pink Diamond Martini
When CK Mondavi and Family told me that they were celebrating their 75th anniversary and they wanted me to create a cocktail in celebration, I was honored! I have had the incredible opportunity to partner with CK Monday & Family for several years now, and have even been able to spend time with Angelina Mondavi, Marc Mondavi and Janice Mondavi. One thing I love about CK Mondavi & Family is their family. They are amazing, genuine people that have made it theirs life’s goal to bring us amazing wines.
CK Mondavi & Family wines are bottled in the Napa Valley by the iconic C. Mondavi & Family. For consumers desiring consistently delicious, everyday wines, CK Mondavi and Family wines over-deliver for the price point of under $10. Based in the Napa Valley for seventy-five years, CK Mondavi and Family’s grapes are 100% sourced from California vineyards, utilizing sustainable farming techniques and winemaking practices that are more typical of expensive wines. Their relentless commitment to quality winemaking and hands-on small lot sourcing sets them apart from other value wines. A large portion of the grapes in CK Mondavi and Family wines are estate grown on the family’s 1,850 acres of vineyard property and the family is committed to working with American growers that they’ve had partnerships with for generations. CK Mondavi and Family are the first and only wines 100% “Made in USA Certified®” and the family produces wines that are consistent, vintage-to-vintage, providing consumers with a value and quality they can rely on. Today, CK Mondavi and Family remains one of the most successful wine brands in America because of its excellent quality and great value.
So what better way to celebrate all their achievements and incredible wines than with a Diamond Sweepstakes and a Pink Diamond Martini?! Diamonds are a girls best friend 😉
I’ll tell you more about the sweepstakes in just a few seconds, but for now, let’s get started on that Pink Diamond Vodka Martini.
Pink Diamond Martini Key Ingredients
CK Mondavi and Family Pinot Grigio
Pummelo Juice – for that pink color
Vodka
Ice
That’s it my friends! Cheers to easy and amazing martinis!
I used the Pinot Grigio because it is fresh and crisp, making it as easy pairing with vodka and the pummelo juice.
What is pummelo juice? Well, simply put, it’s the juice from a pummelo. Ok, that was obvious. What is a pummelo? You can learn all about pummelo here, but for the sake of this incredible martini, I will tell you that pummelo is a citrus fruit, kinda like a grapefruit but sweeter and juicier. Pummelo is grown here in Florida and is in season from October to January. Making pummelo the perfect addition to my Pink Diamond Martini that is celebrating the CK Mondavi and Family Diamond Sweepstakes which runs until December 31st. So, you can create this cocktail all sweepstakes long, then cheers to the winner in January!
How to make a Pink Diamond Martini
First, you juice your pummelo – I cut mine into sections and actually used a lemon squeezer.
Add ice to your martini glass.
Add vodka, wine and pummelo juice to a martini shaker with some ice to make it nice and cold. Shake baby shake!
Pour into your favorite martini glass.
Garnish with a wedge of pummelo and some fresh mint if desired.
Sounds refreshing and amazing, doesn’t it? I thought so too 🙂 Now, here is my Pink Diamond Vodka Martini recipe, be sure to Print It and Pin It so that you can make it again and again.
Say Cheers to this delicious vodka martini made with Pinot Grigio and Pummelo juice!
Prep Time2 minutesmins
Course: Cocktail
Keyword: alcohol, vodka, white wine, wine cocktail
Servings: 2
Calories: 123kcal
Author: Tracy
Equipment
Martini shaker
Martini glasses
Ingredients
4ozCK Mondavi and Family Pinot Grigio
2ozPummelo Juice
2ozVodka
Ice
Get Recipe Ingredients
Instructions
Juice your pummelo - I cut mine into sections and actually used a lemon squeezer.
Add ice to your martini glass.
Add vodka, wine and pummelo juice to a martini shaker with some ice to make it nice and cold. Shake baby shake!
Pour into your favorite martini glass.
Garnish with a wedge of pummelo and some fresh mint if desired.
Cheers!
Notes
If you are making this Pink Diamond Vodka martini when pummelo is out of season, feel free to substitute another citrus. And then be sure to come back and let me know what you thought!
I hope you enjoy my Pink Diamond Martini as much as I do!
And if you are ready to say Cheers! with me, how about trying the winery’s anniversary special wine cocktail. Created by Derek Kwong of Barkeep SF, the CK Mondavi and Family “Mondavi 75” features CK Mondavi and Family Moscato or CK Mondavi and Family Sauvignon Blanc along with lemon and fresh mint for a refreshing seasonal drink. Click here for Barkeep SF’s recipe. Derek will join the fourth generation duo on the live stream to teach them how to craft his new recipe and share tips on other easy wine cocktails.
Feel to create my Pink Diamond Wine Cocktail, my friend’s Blue Diamond Wine Cocktail, or the Mondavi 75 or make your own!
“Our dedication to crafting high quality wines at an approachable price point has never wavered. While we usually enjoy our wines just as they are, trying a special new wine cocktail feels extra celebratory,” said Riana Mondavi, member of the fourth generation and Director of Chains – Western Region. “My sister and I will also be reminiscing about some of our favorite family memories and will be talking about what we envision for CK Mondavi and Family for the next 75 years.”
The complete CK Mondavi and Family collection is available nationwide and includes Moscato, Pinot Grigio, Sauvignon Blanc, Chardonnay, Cabernet Sauvignon, Merlot, and Red Blend, all available for a suggested retail price of $6.99 for a 750 ml bottle., and $13.99 for a 1.5L magnum. New this year, the white wine labels feature color-changing thermochromic ink. They change from a light cream to full color when chilled, at approximately 45-50 degrees, showing just the right serving temperature. If you haven’t bought one of their white wines with these labels yet, you have to, they are so cool! The idea that they tell us when the wine is at the perfect temperature for drinking is so neat to me!
This post may contain affiliate links, please read our disclosure policy.
Discover Florida Starburst Pummelos! Learn what pummelos are, when they’re in season, how they taste, and the best ways to enjoy this sweet citrus.Learn more on when pummelos are in season and how to enjoy them. While this post is sponsored by Noble Citrus, all opinions and my love of Florida agriculture and pummelos are my own.
What Are Pummelos and When Are They In Season?
Living in Florida I have access to the most incredible fruits and vegetables. I may be biased, but in my opinion the best produce comes from Florida. What’s better than getting your fresh fruits and vegetables from the grocery store or farmer’s market knowing that it traveled a minimum distance to get to you and your family? Fresh from Florida to your family. Yes please.
So, what produce do you first think of when you think of Florida? Oranges? Citrus? Yes, years ago Florida was filled with citrus groves. Citrus was easy to grow here in Florida due to our climate, but as we all know, things don’t stay easy forever. Pests were soon discovered eating the leaves, destroying citrus crops. Growing citrus was no longer something that was considered “easy”, it’s a full time job. More than a full time job. Those farmers that bring us Florida citrus don’t work 40 hour weeks, they work all day, every day. And they do that because they want us to have the best produce possible. Why? Why do these men and women, farmers, do this for us? Why do farmers do this for people they don’t even know?
Because being a farmer is a passion.
Being a farmer is a lifestyle.
Many farmers believe that they were called to do what they do.
Florida farmers truly care about YOUR family. Yes, even though you may have never met one. They care about you and what you eat. Because what you eat is what they give their families.
From their Florida farm to you.
So, how do you know if the produce you are grabbing in the grocery store is from Florida? Or even the United States? When it comes to Florida citrus like Starburst Pummelos, the best way is to check the label. I know that sounds simple, but I will openly admit that there was a time that when I went to the store and grabbed fresh fruits or vegetables I just “assumed” that it was from the United States. Well, I’m not sure if you were taught what “assume” means from your parents, but in this situation, my parents were right. And I was wrong.
Just because your produce is sitting in your local grocer, it doesn’t mean that it’s local, or even from our country.
What does that mean to you?
That means if you aren’t buying local, you are buying produce that has traveled who knows how far on a truck or a boat or a truck and a boat to get you. Would you rather eat something that was picked from the tree yesterday or three weeks ago? I pick fresh my friends! Fresh! I may not have a green thumb and the only thing I am successful at growing in my garden is eggplant, so I look for LOCAL, IN SEASON produce in stores and at the farmer’s market. Be sure to do the same. Not sure if it’s local or from the US? ASK!
I know it’s impossible to eat what’s in season locally everyday, so if you really want strawberries and they aren’t in season here in Florida yet, just look at the label and make sure they are from the USA.
Ok, so did you all bear with me on my love of farmers? Thank you if you did. I appreciate you. So do the farmers 😉
Now, onto the pummelo, which I promised to tell you about given the title of the blog post, huh? What did all my information about Florida farmers and citrus have to do with pummelos?
Well, the best pummelos are grown in….you guessed it….FLORIDA. But thankfully, for you all, you can find them throughout the country starting in October.
Wait, what is a pummelo?
Don’t worry, you’re not the first person to ask that question. In fact, I asked it myself not too long ago. Sometimes called a pomelo, the pummelo is the largest citrus fruit and is grown right here in Florida. A pummelo is actually the ancient ancestor of the grapefruit and can be as large as a cantaloupe—or even close to the size of a small watermelon. Inside, you’ll find thick rind and soft, juicy flesh that ranges from pale pink to a rich rose color.
So what’s the difference between pomelo vs pummelo?
Pomelo (single “m”) usually refers to the varieties that are native to Asia, such as China, Thailand, and Malaysia. These pomelos are often a bit less sweet, and because they’ve traveled thousands of miles to get to U.S. grocery stores, they may not be as fresh.
Pummelo (double “m”) is the preferred spelling for U.S.-grown fruit, especially here in Florida. Florida Starburst Pummelos are hand-picked, super juicy, low in acidity, and naturally sweet.
So, what is a pummelo?
Well, the actual definition is that a pummelo is a large citrus fruit that is an ancestor of the common grapefruit. A pummelo is the largest of the citrus fruits and can range from the size of a cantaloupe to a size of a small watermelon. They have a very thick, soft rind and the skin is green to yellow. Once opened, the inside of a pummelo (the flesh) is pink to rose.
How would I describe a pummelo?
A large fruit that smells like a grapefruit, but tastes sweeter than a grapefruit. It is super juicy and is low in acid. You don’t need to cover a pummelo in sugar to enjoy it 😉 Nothing against grapefruit, it’s just not my favorite fruit. But the pummelo, I can definitely eat for a snack or for breakfast. In fact, I did right at the Noble Citrus groves! Remember when I went to Noble Citrus a few months ago to learn about Juicy Crunch? Well, I also got to learn about pummelos…and taste one right off the tree thanks to the owner, Quentin Roe. There is nothing quite like eating fruit hand-picked from the tree. And all the pummelos from Noble Citrus are hand-picked! YES! Hand picked! By hand-picking the incredible Starburst Pummelos from Noble Citrus they are ensuring us that we are getting only perfectly ripe Starburst Pummelos.
What Makes Florida Starburst Pummelos Special?
Yes, these just aren’t any pummelo, these are Starburst Pummelos! When you cut into them you see a beautiful STARBURST. If you’re wondering what a Florida pummelo tastes like, Starburst Pummelos are known for their sweet flavor and low acidity.
Look for that sticker.
Only Starburst Pummelos from Noble Citrus here in Florida will have that sticker. When you see that sticker you know you are getting the best.
You may have heard of a pomelo, that variety typically comes from Asia…it is good…but it’s not from Florida and it’s not nearly as sweet and delicious. And it traveled from Asia to get to you. Not Florida. Not local. Not from the USA. So, look for that sticker. The STARBURST STICKER.
I looked up the food miles from China to the United States, it’s almost 7,000 miles! And who knows how many weeks it takes to get that “fresh” produce to you. Did you know that fresh fruits and vegetables actually start to lose their nutrients after a certain period of time? So, when you are purchasing produce from overseas, you are not only unsure about the food safety of those items, but I can promise you that they aren’t as fresh as if you were buying from farms here in the United States.
And when are purchase items from another country, you are not supporting the food supply here in the United States. To ensure that we have fresh fruit and vegetables here in OUR country, you have to buy fresh fruits and vegetables from OUR country. Farmers will continue to supply us food, but we have to buy it. So, again, I encourage you to look at those labels. Look for products from the United States. When purchasing your pummelos this season, look for that STARBURST sticker so that you know that it came from the United States.
That STARBURST sticker means that they have come from Noble Citrus. Noble Citrus has a Full Food Safety Program, in fact they are the only grower/packer in a Florida 5 Log Reduction Certified Facility. Noble Citrus also has an USDA Inspector onsite to make sure you are getting the quality that they promise. I know I mentioned that Starburst Pummelos are hand-picked at the peak of ripeness, but I wanted to tell you that they are also hand graded and hand packed after they are washed, sanitized and waxed. With care. There is no color added, you are getting the citrus that was pick and delivered to the store. And it didn’t take over 7,000 miles and weeks to get there 😉
When are Starburst Pummelos in season?
So glad you asked! Starburst Pummelos are available for a limited time at limited stores throughout the country. You will find then from Maine down the coast to here in Florida and even in Texas. Starting October 1st! MARK YOUR CALENDARS!!
Yes, these very special Starburst Pummelos are a limited variety! But would you expect anything less? Something so good can’t be available all year long.
You can find Starburst Pummelos in store from late September to late January. And that’s it. So mark your calendars. Now. You don’t need Starburst Pummelo FOMO do you? No, you don’t. So I’ll say it again, mark your calendars with a STAR 😉 Starburst Pummelos are in season starting October 1st to late January. I will be getting mine at Publix.
Have you tried a Noble Citrus Starburst Pummelo before?
No? Now is the time then! Well, you have to wait until their in season, but you get my drift. Like I mentioned, they remind me of a grapefruit, but they aren’t as sour…in fact, I wouldn’t say they are sour at all. They have a high brix value, which means they are super sweet. They are also have very low seeds, if any. So cut one open and enjoy.
That’s what I am about to do 🙂
How to Eat a Pummelo
If you’ve never tried one before, you may wonder how to eat a pummelo. The rind is thick, but once peeled, the juicy segments are easy to enjoy as a snack, in salads, or even in cocktails.
This post may contain affiliate links, please read our disclosure policy.
What exactly is Taco Ramen and How do you make it? Well, Taco Ramen is a fun twist on Taco Tuesday…with ramen noodles! Get the easy steps on how to make Taco Ramen and have dinner ready in under 30 minutes! While this post is sponsored by Florida Dairy Farmers, my love of ramen, tacos and dairy are my own!
How To Make Taco Ramen
Here’s another fun TikTok trend! Have you seen ramen recipes all over TikTok? While I am not on TikTok nearly as much as my kids, I have seen some recipes trends that I had to try! Or that my kids encouraged me to try 😉 And this Taco Ramen Recipe is just that. I swear, my kids could eat ramen every day if I let them! My daughter made ramen last week with the sauce from one of our favorite family recipes, Korean Beef, and it was so good! So next we decided we needed to switch up Taco Tuesday and make Taco Ramen.
Yep, you read that right, Taco Ramen.
So what exactly is Taco Ramen?
Well, we took our favorite ingredients from tacos and added it to ramen! Ground beef, onions, peppers, and we made an incredible creamy cheese sauce to mix in that took our new ramen recipe to the next level.
Taco Ramen Key Ingredients
Ramen – of course. You can discard the seasoning packet that comes with it.
Lean ground beef
Onion
Mini sweet peppers – you can substitute bell peppers if you would like.
Jalapeno – We leave the seeds in because we like a little heat, but you can remove them if desired.
Chicken Broth – I used low sodium.
Seasonings – I used DUST by VooDoo Chef and red pepper flakes.
Cilantro – for garnish if desired.
No taco (or taco ramen) is complete without cheese, so don’t forget this easy creamy cheese sauce!
It’s actually pretty easy! First you will cook the diced veggies until they start to get soft, about 3-4 minutes. Once the onions and peppers are tender, you will add in the ground beef and cook until all the pink is gone. Then you will add in the seasonings, chicken broth and the ramen noodles. While the noodles cook you will make the delicious ooey-gooey cheese sauce. To make the cheese sauce you simply melt the butter, add in the flour, then the Florida milk, then the cheese. Stir until thicken! Once the ramen noodles are cooked, you will add the cheese sauce to the skillet with the beef and ramen, stir, and enjoy! My daughter ate her Taco Ramen with chopsticks, so did my husband actually! I am not that skilled, but I think it’s just as good with a fork 🙂
My kids like it pretty spicy, so they both added a few dashes of hot sauce to theirs, but the flavor is great without it.
I will admit that I thought Taco Ramen may be a bit….weird…but I promise you, it’s delicious! I mean, how can cheese, beef and ramen noodles be wrong?!
Taco Ramen is definitely a delicious spin on Taco Tuesday 🙂
Now, here is my Taco Ramen recipe, be sure to Print It and Pin It so that you can make it again and again.
And while you are at it, check out all the recipes on Food Wine Sunshine and follow on me Facebook, Twitter, Pinterest and Instagram for more FOOD WINE AND SUNSHINE.
This post may contain affiliate links, please read our disclosure policy.
Filled with Southern charm, delicious eats and plenty of things to do and see, Savannah is a excellent vacation destination. Here’s how to plan the perfect weekend in Savannah Georgia.
How To Plan A Weekend In Savannah
With its cobblestone streets, historic architecture, Spanish moss–covered oak trees, and lively riverfront, Savannah is the kind of city that feels romantic, relaxed, and full of stories.
Whether you are planning a girls’ weekend, romantic getaway, or a fun family trip, Savannah offers the perfect mix of history, food, nightlife, and beautiful outdoor spaces.
If you’re wondering how to plan the perfect weekend in Savannah, this guide will help you choose where to stay, what to do, and the best restaurants to try.
Why Visit Savannah?
Savannah, Georgia was founded in 1733 and is one of the oldest city in the United States of America. Visitors from all around the world plan a visit to Savannah to come experience its rich history, incredible architecture, cobblestone streets, historic buildings, amazing restaurants, beautiful parks, breweries galore and much more.
Dripping Southern charm, Savannah is the perfect place to plan a weekend vacation.
Whether you are traveling alone, with your family, with your spouse or celebrating a girls weekend away, there is so much to see and things to do in Savannah! There are several unique tours available to make sure you get to see everything you want to see while you are visiting Savannah.
And one of the best parts? Savannah is incredibly walkable, making it easy to explore during a weekend getaway.
Savannah At A Glance
Best time to visit: March–May or September–November
Ideal trip length: 2–3 days
Walkability: Very walkable
Known for: Historic squares, Southern cuisine, ghost tours, riverfront views
When planning a trip to Savannah, one of the first things you will have to do is decide where to stay.
Where To Stay In Savannah
If you are headed to Savannah for a vacation, I definitely recommend staying on the river. You can beat the views!
We always stay here! It is across the river from River Street, so it gives a little break from the action but still has the river views. They offer a free ferry ride that goes to River Street continuously throughout the day. The rooms are gorgeous and we often find ourselves in the bar for a night cap after a fun day of exploring town.
If you want to stay right in the middle of the action, this hotel is steps away from River Street and many of Savannah’s best attractions.
The outdoor patio overlooking the river is a wonderful spot to relax after exploring the Historic District.
Once you have decided where you want to stay in Savannah, it’s time to plan all the fun things you want to do!
Things To Do During Your Weekend In Savannah
Savannah is packed with activities, but the best way to experience the city is simply wandering through its charming streets and historic squares.
Here are some must-do experiences to add to your Savannah weekend itinerary.
Explore River Street
Savannah has plenty of opportunities to shop and window shop. My favorite place to do some shopping is on River Street. Who can resist the charm of the cobblestone roads, views of the river, boutique shops and the fact that you get a cocktail at any one of the bars and simply ask for your drink in a plastic cup and take it along with you. Shopping can definitely be more fun with a cocktail. You will find many local handmade goods, tourist trinkets and more.
One of the most iconic places to visit in Savannah is River Street.
This historic waterfront area is lined with:
Boutique shops
Art galleries
Restaurants
Historic buildings
Fun bars with river views
The cobblestone streets and views of the Savannah River give this area a unique charm you won’t find anywhere else.
One fun Savannah tradition? Many bars allow to-go drinks, so you can grab a cocktail and stroll the riverfront while exploring.
While you’re there, stop by:
Savannah’s Candy Kitchen
Waving Girl Statue in Morrell Park
The Olympic Cauldron monument from the 1996 Olympic Games
If you enjoy sipping something refreshing while exploring, this Fresh Watermelon Vodka Cocktail is one of my favorite easy drinks to make at home.
Take A Savannah Tour
Savannah offers some truly unique tours that help you explore the city while learning its fascinating history.
Now if you are ready to take a rest from all that walking, but you still want to see more of Savannah, jump on a Savannah Slow Ride Tour. While you get to sit down, you don’t get to necessarily relax. Savannah Slow Ride is a 100% pedal-powered tour of Savannah. You will get a bit of a cardio workout in while you are on the 15-person bicycle, but there are drinks to keep you motivated. Savannah Slow Ride offers a traveling tabletop with a professional tour guide and DJ. You will get the opportunity to tour Savannah and make stops at historic bars along the way. They offer three different two-hour tours; the Pub Crawl, Historic Stories and the Boos Cruise. Each tour is $35/person.
Brewery Tours
Savannah is brimming with local brews. Many of the local breweries offer tours such as; Service Brewing Company, Coastal Empire Beer Company and Southbound Brewing Company. As an added bonus, you can sip samples of their craft beers during the tour. When you are done with the tour, stay around to catch live music and play some outdoor games. Moon River Brewing Company also has really affordable brews on tap and a wonderful beer garden.
If you enjoy craft drinks while traveling, you may also love this Black Velvet Cocktail recipe, a classic beer and champagne cocktail.
If beer isn’t your drink of choice, that’s okay, Savannah has you covered. You can take a free 40-minute guided tour of the Ghost Coast Distillery vodka distillery. When you are done with the tour, head to the taproom to sample some cocktails. While this is a family-friendly tour, only guests that are of legal drinking age can sample the cocktails.
Ghost Tours
Savannah is considered “America’s Most Haunted Cities” after-all. Savannah has been the place of wars, fires, deadly diseases, and slavery so it’s no wonder that it is to be said to be a large amount of paranormal activity here. Just walking in one of the historic cemeteries can definitely give you the chills. Whether you believe in ghosts or not, taking a ghost tour gives you the opportunity to learn more about the history of Savannah and see more of this historic town. Savannah Ghost Tours allows you to take a chilling walk through Savannah’s haunted history with where tales of war, tragedy, and lingering spirits reveal the eerie side of this picturesque Southern city.
Haunted Savannah Pub Crawl
If you think you need a little liquid courage to take on the haunts of Savannah, then the Savannah Haunted Pub Crawl may be for you. This is a two-hour guided tour for those that are 21+ years old. This walking tour stops at several of Savannah’s haunted bars and pubs. Prices start at $29 per person.
Savannah Slow Ride Boos Cruise
The 100% pedal powered tour has a ghost tour as well. This two-hour will creep past remarkable scenes from war battles, mass graves, haunted houses and landmarks. Prices are $35/person.
Trolley Tours
If you don’t want to walk or pedal around the haunted streets of Savannah in the dark, jump on one of the many trolley tours. There are many two-hour trolley tours that will introduce you to some the most famous spirits in Savannah. This tour will also take you inside some of the most haunted spots, including the rum cellar at The Pirate’s House.
Now that you have toured and drank your way around Savannah, it’s time to relax at Forsyth Park. This beautiful park is perfect for lounging in the grass, having a picnic or throwing a frisbee. Dating back almost 200 years, this park occupies 30 acres in the Historic District. The iconic water fountain at the center is a landmark in itself, but the walking trails, Fragrant Garden, and a cute cafe make for a relaxing spot on your girls weekend itinerary.
You will find the oldest public art museum in the Southeast in Savannah as well. The Savannah’s Telfair Museum consists of two National Historic Landmark buildings circa 1820, the Telfair Academy and the Owens-Thomas House. You can also walk the contemporary Jepson Center, which houses unique exhibitions, tours and collections throughout the year.
If you are wanting to check out the Savannah nightlife on your weekend away, The Rail Pub is at the center of Savannah’s nightlife scene. Located on West Congress Street The Rail Pub is two-story building with an outdoor courtyard, where you can often catch live music. Swing in on Friday night to score free fried chicken!
And if you are looking for a night in that may just be more fun than a night out, check out the Cocktail Boys. They are southern gentlemen, butlers, and fun bartenders that cater to bachelorette parties, birthdays, and girls’ weekends. Their Boys will make and serve drinks, take and pose in pictures, pamper the bride and bridesmaids, be Spotify DJs, help with party games, and overall just make a pregame, brunch, game night, house party, or pool party wayyy more fun.
Relax At Forsyth Park
No Savannah weekend is complete without visiting Forsyth Park.
Located in the Historic District, this 30-acre park is famous for its iconic white fountain, walking paths, and beautiful oak trees draped with Spanish moss.
It’s the perfect place to:
Relax with a picnic
Take photos
Walk the scenic trails
Enjoy a slow Savannah afternoon
Visit Savannah Museums
Art and history lovers should visit the Telfair Museums, the oldest public art museum in the Southeast.
The museum includes three locations:
Telfair Academy
Owens-Thomas House
Jepson Center
Each offers a unique perspective on Savannah’s art, architecture, and culture.
They serve up a killer plate of nachos. But they aren’t your typical nachos. The Nachos Grande is waffle fries, pickles, fried chicken, bacon, cheddar cheese w/ chive ranch and balsamic gastrique oh my!
This is an old Greyhound bus station that now serves up five-star dishes. They serve up artfully executed menu and you will love the restored Art Deco interior and incredible service.
A testament to tradition and history. It is located beside Reynolds Square in Savannah’s only standing 18th Century mansion. The menu is tailored to the season, they are always creating with fresh ingredients. This is a fine dining restaurant, however you can request to sit downstairs where it’s more relaxed and casual. That’s where we usually sit 😉
Savannah River House Seafood
The Savannah River House Seafood located in the Historic District right on River Street offers fresh local seafood and a beautiful view of the river.
Oysters are an essential part of the coastal-style cuisine in Savannah, so you can find many restaurants that serve em up restaurants, especially on River Street.
If you’re a foodie traveler like I am, you may also enjoy exploring Downtown Napa, which is filled with incredible restaurants and tasting rooms.
Sample Weekend Savannah Itinerary
Day 1
Explore River Street
Visit Savannah shops and historic squares
Take a brewery or distillery tour
Dinner at The Grey or Treylor Park
Ghost tour after dark
Day 2
Morning walk through Forsyth Park
Brunch in the Historic District
Visit Telfair Museums
Shopping along River Street
Sunset drinks overlooking the river
What things will you be adding to your weekend in Savannah travel itinerary?
FAQs About Visiting Savannah
Is Savannah walkable?
Yes! The Historic District is extremely walkable, and many of the best attractions, restaurants, and parks are within a few blocks of each other.
Is Savannah good for a weekend trip?
Absolutely. Savannah is the perfect weekend destination because you can experience the city’s history, food, and culture in just a couple of days.
What is Savannah best known for?
Savannah is known for its historic architecture, charming public squares, Southern cuisine, haunted history, and beautiful riverfront.
Final Thoughts
From historic streets and incredible restaurants to scenic parks and lively nightlife, Savannah is truly one of the most charming cities in the South.
Whether you’re visiting for a girls’ getaway, romantic weekend, or family vacation, there are endless ways to enjoy a weekend in Savannah.
Once you visit, you’ll quickly see why so many travelers fall in love with this unforgettable Southern city.
This post may contain affiliate links, please read our disclosure policy.
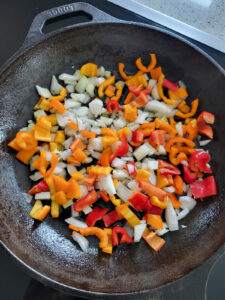
Learn how to make a quick and easy frittata with eggs, veggies, and your favorite protein. Perfect for breakfast, brunch, or even dinner in under 20 minutes!
How To Make A Frittata
A frittata is one of those menu items that sounds fancy, but it really isn’t. A frittata is actually really easy to make, super easy to customize, and you can actually make it in a variety of ways. So, if you are looking for an easy breakfast recipe, lunch idea, or “brinner” recipe, make a frittata. You can’t go wrong!
What exactly is a frittata?
Think of a frittata as a crustless quiche. It’s fluffy, customizable, and the perfect way to turn eggs into a colorful, protein-packed meal. Unlike omelets, frittatas are easy to slice and serve to a crowd—or just enjoy for yourself!
Key Ingredients To Make A Frittata
Eggs
I mean, really, you could get away with making a plain egg frittata but it may be a little boring.
I love adding fresh veggies and a little meat to my frittatas. For this frittata recipe I used:
Eggs
Mini Sweet Peppers – you could substitute a regular bell pepper
Sweet Onion
Steak – I had it leftover from dinner the day before, you can use any protein that you would like. BACON! Or leave it off for a meat-free frittata.
Simple Additions
CHEESE! You can definitely top your frittata with cheese…and a lot of it.
Pro tip: Want a fun twist? Try my Protein-Packed Pizza Frittata for a cheesy, protein-filled breakfast that’s perfect for a weekend brunch!
Why I love making frittatas:
They are EASY.
I can use whatever veggies and protein I have in the refrigerator.
They are pretty inexpensive to make.
They look fancy when you serve a slice.
Well, Hellmann’s Creamy Sriracha Dip and Sauce is delicious on a lot of things, like my Chicken Fried Rice or my Egg Roll In A Bowl. But it’s a simple addition to your simple frittata that will really take your frittata to the next level. Plus, who doesn’t like creamy sriracha sauce?!
How do you make a frittata:
Preheat oven to 425 degrees.
Prepare the vegetables that you will be using – wash, dry, dice.
Dice cooked meat.
Heat a small amount of oil over medium heat in cast iron skillet or similar skillet that is oven safe.
Saute your vegetables.
Once the vegetables are soft, add in the cooked meat.
Crack eggs into a medium size bowl, scramble with fork.
Pour eggs into the skillet.
Allow egg mixture to cook for about a minute, then place in the oven.
Cook for 7-10 minutes until eggs are cooked throughout.
Slice, serve, top with Creamy Sriracha Sauce.
Do you have to bake a frittata?
Nope! When I don’t feel like warming up the oven, I follow the directions as listed above but instead of putting it in the oven, I cover the skillet with a lid and allow the egg mixture to cook until done. About 5-10 minutes depending how big your frittata is.
Tips for the Best Frittata
Use leftover proteins to reduce waste and add flavor.
Add fresh herbs like parsley, chives, or basil for a flavor boost.
Try seasonal vegetables for variety throughout the year.
Top with a sauce or dip for a restaurant-style finish.
Ok, now onto my Easy Frittata Recipe. Be sure to Print It and Pin It so that you can make it again and again.


