This post may contain affiliate links, please read our disclosure policy.
This purple ice cream is made with purple sweet potatoes, giving it that vibrant fun color! Add in Florida Milk for creaminess and a little sweetener and you have a delicious no churn purple sweet potato ice cream. While this post is sponsored by Florida Milk, my love of healthy and yummy dessert recipes and Florida Milk are my own.
The summer temperatures are soaring and we are all looking for ways to cool down and beat the heat. One delicious way to do just that is to enjoy some delicious homemade ice cream. Not just any homemade ice cream though…purple sweet potato homemade ice cream!
You read that correctly, purple sweet potato ice cream! What do you mean you never thought of making ice cream out of vegetables before? Seriously though, purple sweet potatoes have a deliciously sweet flavor that makes them perfect for making dessert with. Plus, who doesn’t love the color purple? No food coloring needed in this fun ice cream recipe!
While the idea of using sweet potatoes for dessert might seem kind of strange to us, besides sweet potato pie of course, but the Japanese use purple sweet potatoes in traditional desserts all of the time. They are also commonly used in desserts throughout Southeast Asia. Purple sweet potato ice cream is called Ube, pronounced “ooh-beh”.
Not only are these sweet potatoes a beautiful purple color, but they also taste sweet with a flavor reminiscent of maple syrup. Some people also say the flavor reminds them of light vanilla, or lavender, all of which work great with ice cream!
Purple sweet potatoes are high in fiber, vitamin C, and potassium, as well as antioxidants. You can feel great about serving this purple ice cream treat to your family because it’s healthy. They might not believe that it is made with a vegetable though!
Ingredients for Purple Sweet Potato Ice Cream
To make this tasty, refreshing, and hydrating (very important on a hot summer day) treat you will need just a few ingredients. You will need purple sweet potatoes that have been cooked, peeled, mashed, and cooled. You will also need whole milk, sea salt, maple syrup, and vanilla extract.
How To Make Sweet Potato Ice Cream
Once your sweet potatoes are ready, put them in your blender and add your other ingredients. Blend all of the ingredients together for three to four minutes until they are very smooth. Pour the mixture into a bowl and cover it and put it in the freezer. The mixture needs to chill for at least four hours.
Don’t have an ice cream maker? Don’t worry about it, you can still have homemade ice cream. Blend your ingredients together until smooth just like above, and then pour the mixture into a freezer-safe container and freeze for 5 to 6 hours.
If you have one, use an ice cream maker to freeze your purple sweet potato ice cream and then place it in a freezer-safe container so that it can continue to set. Remove the ice cream from the freezer about 15 minutes before serving, so that you can scoop it out.
If you would like a garnish for your sweet potato ice cream, you can chop and toast some nuts for a topping. The sweet, salty, and crunchy combination is delicious and pairs really well. You can also just serve it plain and it will still be delicious. Whipped topping and sprinkles and slivered almonds is how I topped mine…simple, yet perfect.
This boldly colored treat is one that you can feel great about indulging in, after all, it’s basically just blended vegetables and Florida milk. If you have kids who don’t like to eat their veggies, this is a great way to sneak some in. After all, who doesn’t want a nice bowl of creamy ice cream on a hot summer day? You don’t have to tell them that it’s good for them!
Alright, let’s make some no churn purple ice cream shall we?
Looking for a healthy sweet treat that is super easy to make? Try this purple ice cream! Made with just a few ingredients, it's prepped in under 10 minutes and is made with purple sweet potatoes!
1cupcooked mashed and packed purple sweet potato approx 2 small sweet potatoes I cooked mine in the microwave for 5 minutes. Be sure to poke holes in it before cooking.
1 ⅔cupsWhole Florida Milk
2tablespoonmaple syrup*more to taste
1tablespoonvanilla extract
1/4teaspoonsea salt
Get Recipe Ingredients
Instructions
Add the mashed sweetpotato, milk, maple syrup, vanilla and salt to your favorite blender.
Blend until smooth and mixed thoroughly.
Pour the sweetpotato mixture into a loaf pan.
Cover with plastic wrap and place in the freezer.
Every 30 – 45 minutes stir the sweetpotato mixture, the edges will start to freeze first and you will want to stir that in to insure an even creamy texture. Do this at least 3 times.
Your ice cream will be ready to enjoy in about 3 to 4 hours. If you freeze your homemade ice cream overnight you will need to allow it to thaw on the counter for about 5 mins so that it is soft enough to scoop.
I topped mine with whipped topping, almond slivers and sprinkles. Other toppings could be chocolate syrup, caramel sauce, and/or fresh fruit.
Enjoy!
Notes
You can leave your purple sweet potato ice cream in the freezer for about 2 weeks, but it’s best fresh.
And while you are at it, check out all the recipes on Food Wine Sunshine and follow on me Facebook, Twitter, Pinterest and Instagram for more FOOD WINE AND SUNSHINE.
This post may contain affiliate links, please read our disclosure policy.
Looking for a relaxing getaway in the Florida Keys? Discover why Isla Bella Beach Resort on Marathon Key is perfect for beach views, luxury suites, water activities, and a girls’ weekend you’ll never forget!
Florida is filled with tropical destinations that you can visit. And you will most-likely have an amazing time at each and every one of them. I mean, they don’t call it the Sunshine State for nothing! We are the home to some of the best beaches in the United States. So, as a resident for over 20 years, how do I go about planning a Florida vacation where I want beach, sunshine and relaxing but I don’t want it to feel like my backyard. Tricky huh?
Well, I will be honest, I enlisted the help of a travel agent. With the THOUSANDS of options here in Florida, I was really looking for something special to celebrate by best friend. We were escaping away for a long weekend for her 50th Birthday Celebration.
We needed something swanky, sexy, yet age appropriate. Yes, those were my exact words. We didn’t need to be anywhere where all our neighbors were partying until 4 am. While, there is absolutely nothing wrong with that…If you are the 4 am party-person…GOOD FOR YOU! That’s just not the trip we were looking for.
My friend and I have been best friends for over 20 years. We have been through a LOT. Marriages, children, heart ache, divorce, death but above all we have always been there for each other. For the smiles, hugs, laugh, tears, and the screams. The days that you need that shot of fireball at 10 am just to try to make it through the day, the afternoons that turn into nights where you sit and just talk until. The mornings where we walk for hours because it’s not only exercise, but our therapy sessions.
So, how the hell do you plan a trip to celebrate a LIFETIME of friendship?
We road tripped down to the Florida Keys. It’s about a 7 hour drive for us from Tampa, so we did stop one night about 4 hours south. It was perfect because then we got to our final destination nice and early.
Why Isla Bella Beach Resort on Marathon Key is Perfect for Your Florida Keys Getaway
We pulled up to the gates and drove along a tree-lined windy road and then you saw a beautiful white building where we checked in.
We opened those doors and just about cried. You saw nothing but windows and that view…oh, that view was GORGEOUS blue water and white sand. That view screamed – RELAX HERE. That view screamed – YOU’VE ARRIVED.
Now, we did get there early, so our room wasn’t ready, but the staff offered us a complimentary glass of champagne (YES PLEASE) and we sat on the couches outside and took deep breathes of that sexy salt-filled air.
Which was one of our favorite places for the next several days.
The food was great and damn, those bartenders make a killer cocktail. We had the smoked mahi-mahi fish dip every day I believe…yes, it was that good. My recommendation for a cocktail is the Hot Passion…it is a little spicy, but it’s AH-MAZING. I also recommend after you have two…have a couple glasses of water and some food 😉
And if you’re a wine lover like me, be sure to check out my guide on the best white wines to pair with seafood – perfect for planning what to sip with mahi‑mahi, stone crab, oysters, and more while you’re in the Keys.
When the room was ready, we found out that we were upgraded to a two-bedroom two-bathroom suite – that had that view of the water!! YES PLEASE.
We ate breakfast, lunch and dinner by the water every day. I mean, how could you not?? For dinner…be sure to make a reservation to make sure you get a table on the water….THAT VIEW!
We went to breakfast everyday in our swim suits, then headed right to the beach with our books. We relaxed, read and took in some vitamin D. By lunch, we were ready for a glass (read bottle) of wine by the water, which we enjoyed until it was time for lunch.
Pro-travel Tip: Pack a couple bottles of wine and bring em with you! Not only will it save you some money, but it guarantees that you’ll have wine you like. I brought 5 bottles with us in my Fly With Wine suitcase.
For activities other than sitting on the beach reading and sipping wine, we also headed to Key West one day. Marathon Key is a little over half way to Key West, so you really can’t go and not head all the way down. Plus, my bestie has never been! We left for Key West a little after lunch and spent the day listening to live music, then headed to Mallory Square for sunset before heading back to Isla Bella.
Another way to enjoy the sunset is on a JET SKI. Yep, we did that one day too. We did the jet ski sunset cruise right from Isla Bella Beach Resort. We had the bestest (yes, bestest) guides ever. It was Jen’s (my best friend) only 2nd time on a jet ski and she did AWESOME. It may sound silly, but it’s kinda freeing to be able to cruise around by yourself on the ocean.
Alright…my best friend’s birthday trip was indeed one that we will never forget. It was ABSOLUTELY beautiful and the staff was all so nice. If are wondering, they did have things to do for kids…lots of activities, several pools and, of course, a beach. But, as two grown-women who left their kiddos at home, we didn’t feel like we were surrounded by kids either, it was a nice balance for those looking for an adult getaway as well. Like us.
Here are several reasons why staying at Isla Bella Beach Resort on Marathon Key is a great choice:
Beautiful Beachfront Location: Isla Bella Beach Resort boasts a stunning beachfront location, offering direct access to a private sandy beach. You can enjoy breathtaking views of the turquoise waters and relax on the pristine shoreline right outside your accommodation.
Luxurious Accommodations: The resort offers a range of luxurious accommodations, including rooms, suites, and beach houses. Each unit is elegantly designed and features modern amenities, comfortable furnishings, and private balconies or patios with ocean views.
Resort Amenities: Isla Bella Beach Resort provides a wealth of amenities to enhance your stay. Enjoy the resort’s multiple swimming pools, as well as a private pool for adults only. There’s also a full-service spa, fitness center, and waterfront dining.
Water Sports and Activities: The resort offers a variety of water sports and activities for guests to enjoy. You can rent kayaks, paddleboards, and jet skis to explore the surrounding waters. Snorkeling, fishing, and boat charters are also available for those looking to further immerse themselves in the marine environment.
On-site Dining: Isla Bella Beach Resort features several on-site dining options, ranging from casual to fine dining. You can savor fresh seafood, Caribbean-inspired cuisine, and other delicious dishes while enjoying the scenic views of the ocean.
Relaxation and Tranquility: If you’re seeking a peaceful and serene getaway, Isla Bella Beach Resort provides a tranquil atmosphere that allows you to unwind and rejuvenate. The resort’s beautifully landscaped grounds, private beach, and secluded pools create an ambiance of relaxation and tranquility.
Proximity to Attractions: Marathon Key is centrally located in the Florida Keys, making it a convenient base for exploring the surrounding area. From Isla Bella Beach Resort, you can easily access popular attractions such as Sombrero Beach, the Turtle Hospital, and the Dolphin Research Center.
Overall, staying at Isla Bella Beach Resort on Marathon Key offers a combination of luxury, natural beauty, and access to a wide range of activities.
Getting There and Around
Isla Bella Beach Resort is super easy to reach. Whether you’re driving from Tampa like we did, flying into Key West or Miami, or hopping in a rental car, the resort is conveniently located in Marathon Key, right in the heart of the Florida Keys. There’s ample parking on-site, and getting around the Keys is a breeze with scenic drives over bridges and waterways.
Best Time to Visit
The Florida Keys are beautiful year-round, but timing can make a difference:
Spring and fall: Perfect for pleasant temperatures, lower humidity, and fewer crowds.
Winter: Mild weather and sunny days—great for escaping colder climates, though prices may be higher.
Summer and hurricane season (June–November): Hotter, more humid, and a bit wetter, but also fewer tourists and often resort deals.
Planning ahead ensures you hit the sweet spot for weather, activities, and relaxing by the water!
Top Things to Do While Staying on Marathon Key, Florida Keys
Sombrero Beach: Enjoy the sun, sand, and turquoise waters at Sombrero Beach. It’s a beautiful spot for swimming, sunbathing, picnicking, and snorkeling.
Dolphin Research Center: Visit the Dolphin Research Center to learn about marine life conservation and interact with dolphins. You can participate in dolphin encounters, watch educational presentations, and even swim with the dolphins.
Turtle Hospital: Take a tour of the Turtle Hospital, a rescue and rehabilitation center for injured sea turtles. Learn about the hospital’s efforts to protect these amazing creatures and witness the rehabilitation process.
Curry Hammock State Park: Explore the natural beauty of Curry Hammock State Park. Enjoy activities like swimming, snorkeling, kayaking, and fishing. The park also has scenic nature trails and picnic areas.
Pigeon Key: Take a boat or ferry to Pigeon Key, a historic island with charming cottages and a museum. Learn about the island’s history and enjoy its picturesque views and walking trails.
Florida Keys Aquarium Encounters: Get up close and personal with marine life at the Florida Keys Aquarium Encounters. You can snorkel in a coral reef tank, hand-feed sharks and stingrays, and learn about various marine species.
Seven Mile Bridge: Drive or walk along the iconic Seven Mile Bridge, which connects Marathon Key to the Lower Keys. Enjoy breathtaking views of the ocean and the surrounding islands.
Kayaking and Paddleboarding: Rent a kayak or paddleboard and explore the calm and crystal-clear waters surrounding Marathon Key. You can paddle through mangrove trails, observe wildlife, and enjoy the serene atmosphere.
Deep-Sea Fishing: Charter a boat and go deep-sea fishing in the abundant waters off Marathon Key. The area is known for its excellent fishing opportunities, including catching species like tarpon, marlin, sailfish, and snapper.
Sunset Celebration at Marathon Marina: Head to the Marathon Marina to experience the Sunset Celebration. Enjoy live music, local food vendors, and stunning views as the sun sets over the water.
Remember to check local guidelines and availability for each activity or attraction, as some might have specific requirements or limitations.
Now, the only thing on the list above that we did was drive the Seven Mile Bridge. We weren’t looking for a lot of activities or things to do while staying on Marathon Key, we were looking to relax, celebrate our friendship and enjoy. And that’s exactly what we found at Isla Bella Beach Resort.
Not sure if Isla Bella Beach Resort is the one for you on your next Florida Keys vacation? WHAT?! I guess it could happen 😉
Other Amazing Florida Keys Resorts to Consider:
Tranquility Bay Beach House Resort: This beachfront resort offers spacious and well-appointed beach houses with private balconies or patios. It features a private beach, multiple pools, a waterfront tiki bar, and on-site dining options. Located on Marathon Key.
Hawks Cay Resort: Nestled on Duck Key, Hawks Cay Resort offers a variety of accommodations, including hotel rooms, suites, and villas. The resort boasts a private marina, multiple pools, a saltwater lagoon, water sports activities, and several dining options. We have actually stayed here several times as well.
Courtyard by Marriott Marathon Florida Keys: This well-known hotel brand offers comfortable rooms with modern amenities. It features a waterfront pool, a fitness center, on-site dining, and is conveniently located near attractions like Sombrero Beach.
Airbnb and Vacation Rentals: The Florida Keys has a variety of vacation rentals available through platforms like Airbnb. From waterfront condos to beachfront houses, these rentals offer flexibility and a homely atmosphere.
Have you stayed in the Florida Keys before? Where is your favorite place to stay?
This post may contain affiliate links, please read our disclosure policy.
Looking for something delicious to enjoy for breakfast or brunch? These sweet stuffed pancakes are it! Hotteok, Korean Sweet Pancakes, are a popular Korean street food and are a must try! While this post is sponsored by Florida Milk, my love of yummy breakfast ideas and Florida Milk are my own.
I absolutely love my partnership with Florida Milk. And for a quite a few reasons…1) I L-O-V-E being given the opportunity to advocate for Florida Dairy Farmers. 2) My family and I love Florida Milk. 3) They are always challenging me with fun ideas for recipes. Well, there’s a bunch of reasons why I love working with Florida Milk, but we will leave it to those 3 for now so I can tell you about these sweet stuffed fried pancakes.
AKA Korean Sweet Pancakes.
AKA Hotteok.
What is Hotteok?
Hotteok is a popular Korean street food that is simply put, a sweet filled pancake. It is a traditional snack that originated in Korea. Hotteok, Korean sweet pancakes, are typically made from flour, yeast, sugar, salt, and milk.
The most common filling for Hotteok is a mixture of brown sugar, cinnamon, and chopped nuts, such as peanuts. The filling is placed in the center of the pancake dough, which is then sealed and flattened. The filled dough is then fried until it becomes golden brown and crispy on the outside, while the filling melts and becomes gooey and caramelized.
Hotteok is typically sold by street vendors or in small food stalls, where it is freshly made and served nice and hot.
What is the history of Hotteok?
Hotteok dates back several centuries and can be traced to the Joseon Dynasty, which ruled Korea from the 14th to the late 19th century.
Hotteok is believed to have been inspired by a Chinese street food called “Yuebing,” which is a stuffed pancake. When the Chinese immigrants introduced Yuebing to Korea, it underwent modifications and adaptations, eventually becoming what is now known as Hotteok.
Originally, Hotteok was considered a seasonal food, primarily consumed during the winter months. It was a warming treat that provided comfort during the cold weather. However, it gradually gained popularity throughout the years.
Hotteok was traditionally prepared using simple ingredients that were readily available at home, such as flour, yeast, sugar, and water. The fillings typically consisted of brown sugar, cinnamon, and chopped nuts, which were affordable and easily accessible.
Over time, Hotteok evolved as variations and regional adaptations emerged. Different fillings and flavors were introduced, including cheese, red bean paste, and savory options, catering to diverse preferences. The popularity of Hotteok expanded beyond street vendors, and it is now commonly found in markets, festivals, and even some Korean restaurants. Or in your kitchen 😉
The history of Hotteok showcases how this simple and humble snack has become an integral part of Korean culinary culture, offering a delightful blend of flavors and textures.
What other fillings can you put in Korean Pancakes?
Like I mentioned, the traditional filling for Hotteok is a mixture of brown sugar, cinnamon, and nuts. I added mini chocolate chips to my recipe…I mean, who doesn’t love melted chocolate covered in fried pancake dough?!
Here are some other popular alternative fillings for Hotteok:
Cheese: Adding a slice or grated cheese to the filling creates a gooey and savory twist to the pancake. Popular cheese options include mozzarella, cheddar, or a combination of different cheeses.
Nutella: This creamy chocolate-hazelnut spread is a favorite filling for those with a sweet tooth. The combination of Nutella and the soft pancake creates a delightful and indulgent treat.
Red bean paste: Known as “pat” in Korean cuisine, sweetened red bean paste is a classic filling choice for various Korean desserts. It has a slightly sweet and earthy flavor that pairs well with the pancake dough.
Fruits: Sliced fruits like bananas, strawberries, or apples can be added as fillings to introduce freshness and a burst of flavor. They can be combined with sweeteners like honey or maple syrup for added sweetness.
Custard or cream fillings: Creamy custard fillings or sweet creams like vanilla or chocolate can provide a luscious and rich experience. These fillings complement the pancake texture well.
While Korean Sweet Pancakes are typically associated with sweet fillings, you can also experiment with savory options. Fillings like kimchi, vegetables, or seasoned minced meat can create a savory and satisfying version of the pancake.
Feel free to get creative! You can mix and match ingredients to create your own unique flavors. Speaking of ingredients….let’s make some Korean Sweet Pancakes, shall we?? Don’t forget to have an extra glass or two of Florida Milk for serving!
And while you are at it, check out all the recipes on Food Wine Sunshine and follow on me Facebook, Twitter, Pinterest and Instagram for more FOOD WINE AND SUNSHINE.
This post may contain affiliate links, please read our disclosure policy.
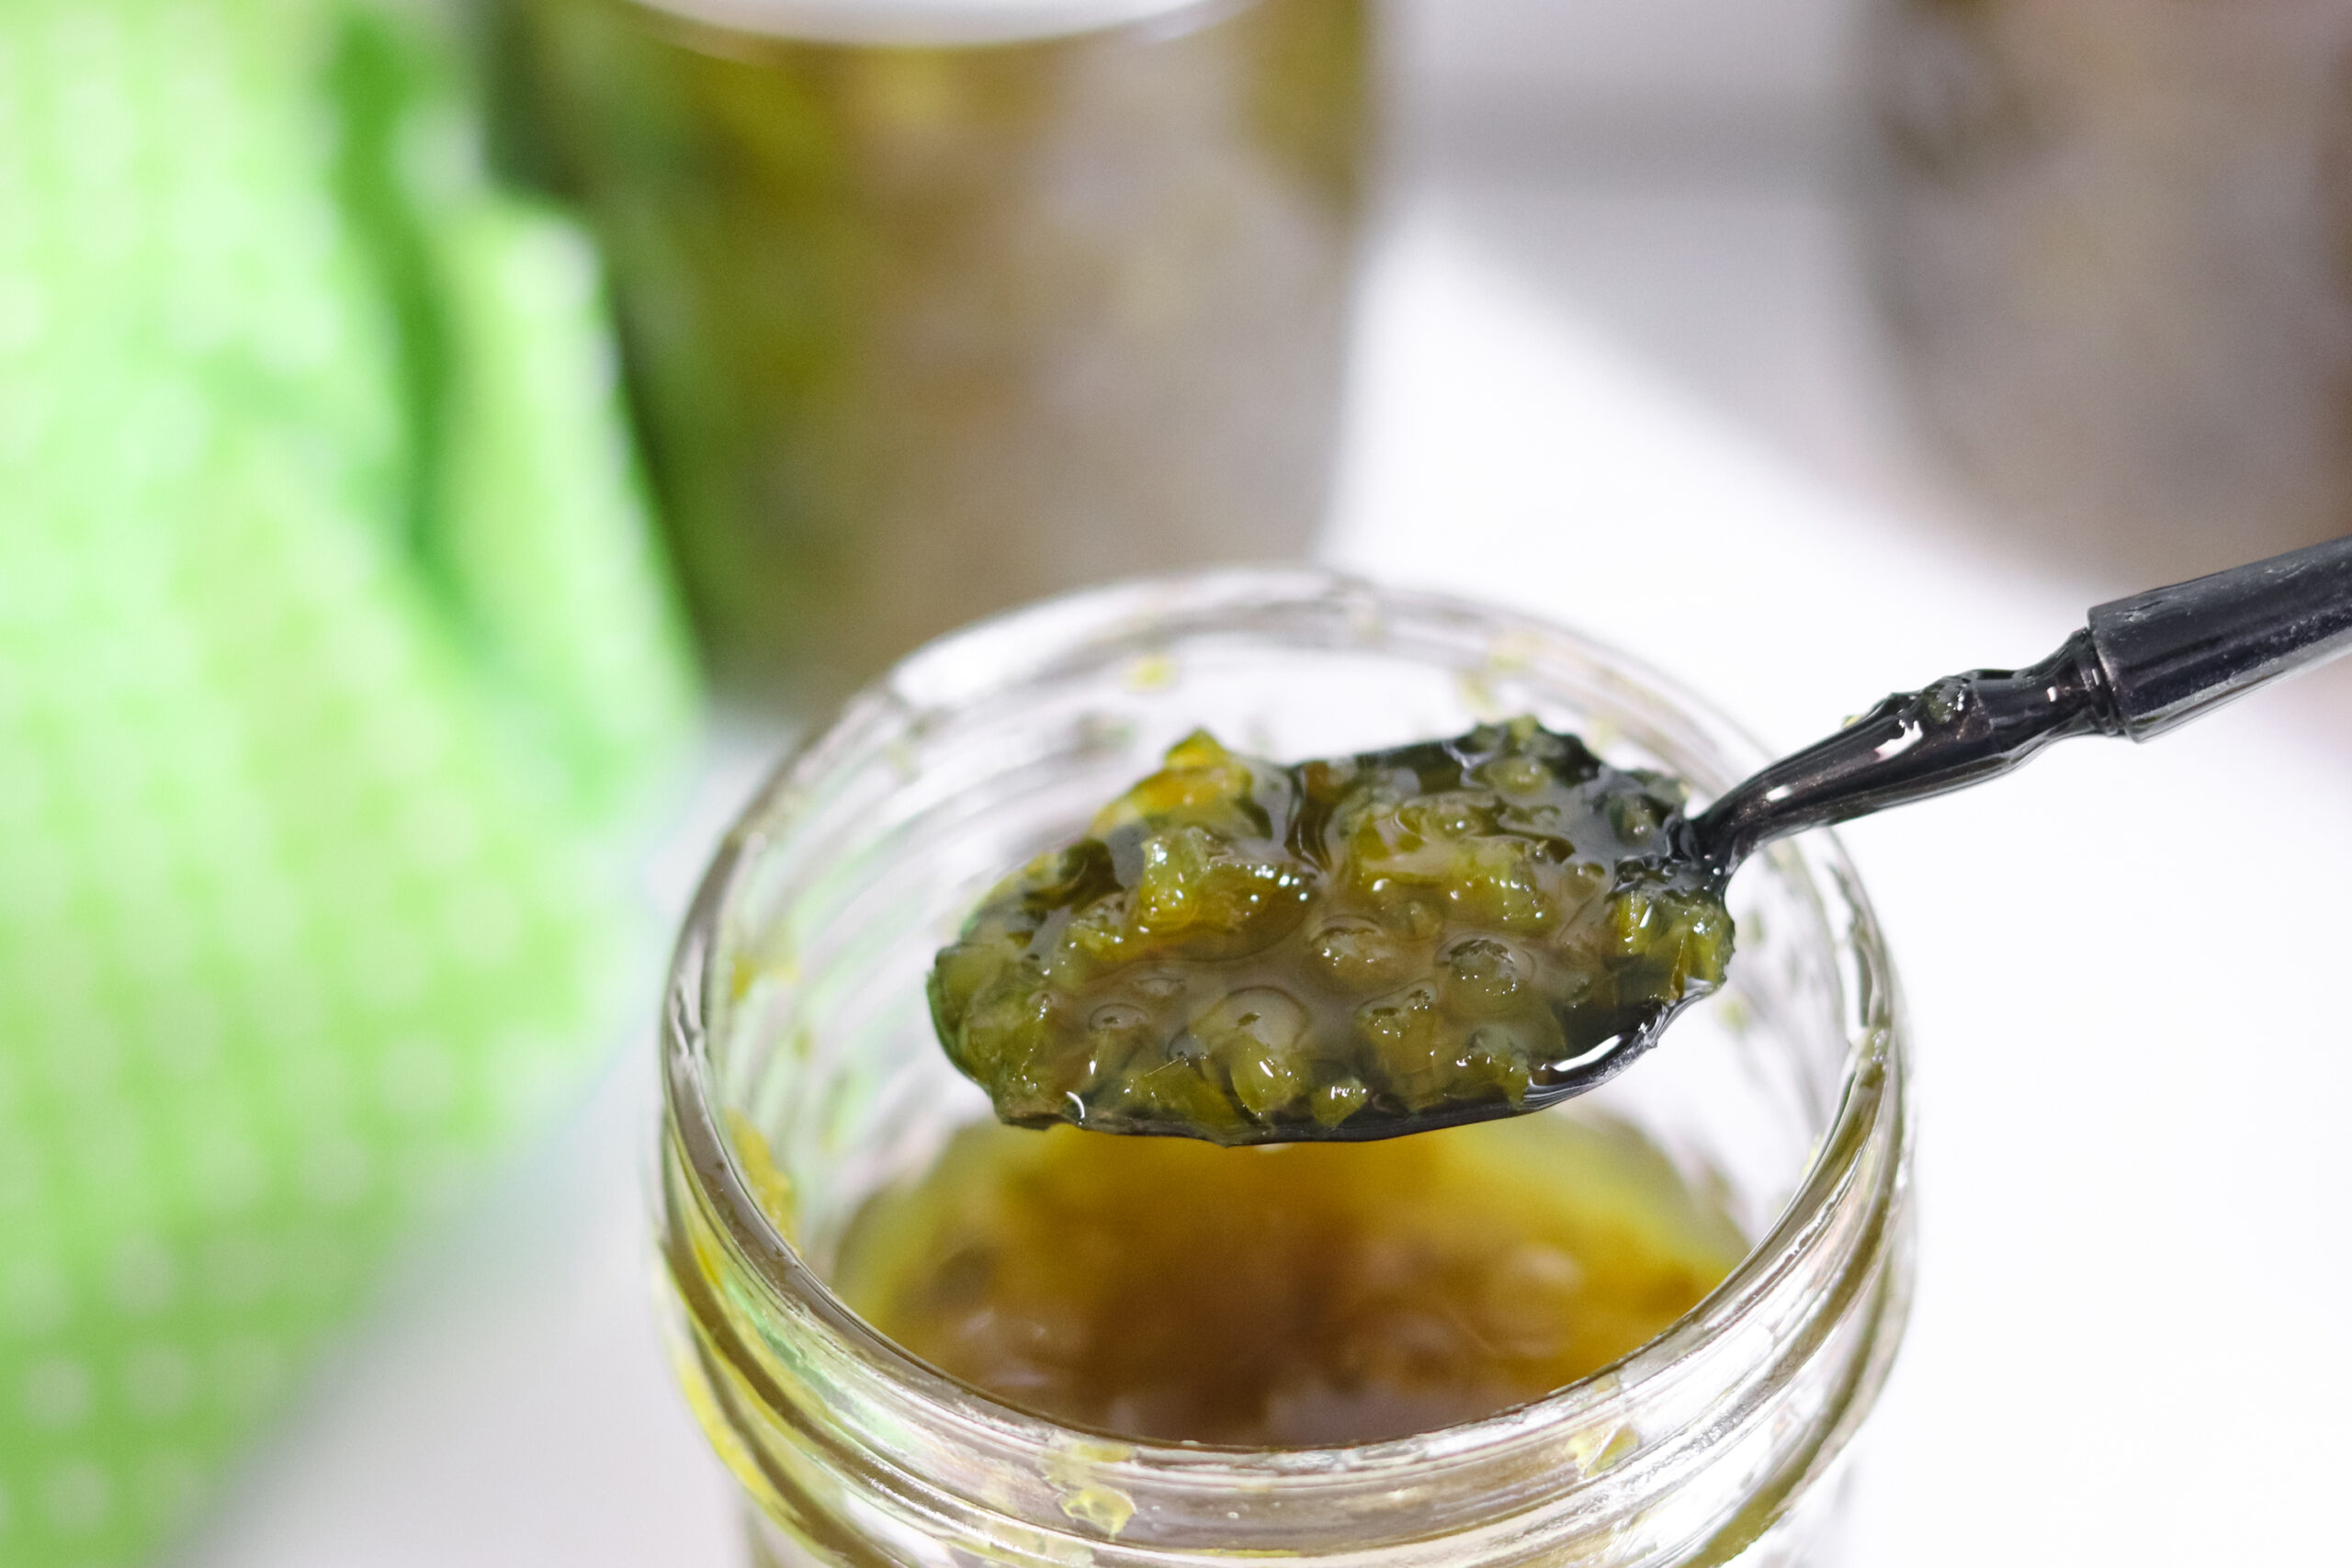
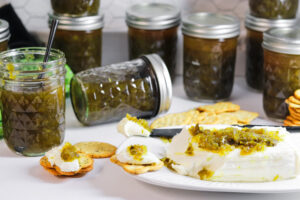
Got peppers? Make this hot green pepper jelly! It takes about 1.5 hours to make, but it’s worth it, I promise! This green pepper jelly recipe is a great way to preserve peppers from your garden while they are in season!
Is your garden bursting with fresh vegetables? We love planting peppers, well, I’m sure you all know by now my whole family likes everything a bit spicy, so peppers never go to waste in my house. If you have a lot of peppers in your garden and you are trying to figure out how to use some, make this green pepper jelly!
One of the easiest appetizers you’ll ever make is grabbing a brick of cream cheese, putting it on a plate, then adding a flavorful jelly on top. Serve with fresh veggies, crackers or pita chips. YUM!
Green peppers are typically in season during the late summer and early fall months. The exact timing may vary depending on your location and climate. In general, the peak season for green peppers is from July to October.
What type of peppers do you use to make Hot Green Pepper Jelly?
To make green pepper jelly, you typically use green bell peppers, also known as sweet peppers. However, like I mentioned, we like it spicy, so we added in a variety of hot peppers too. Feel free to experiment with other types of peppers to add different levels of heat and flavor to the jelly.
Here are a few green pepper varieties you can consider using:
Green Bell Peppers: These are the most common peppers used for green pepper jelly. They have a mild and sweet flavor, adding a pleasant taste to the jelly without much heat.
Anaheim Peppers: Anaheim peppers are slightly hotter than green bell peppers but still relatively mild. They have a tangy and slightly spicy flavor, which can give your jelly a subtle kick.
Poblano Peppers: Poblano peppers are mildly spicy and have a rich, earthy flavor. Using them in your jelly will add a deeper, smoky taste to the final product.
Jalapeño Peppers: If you prefer a spicier jelly, you can incorporate jalapeño peppers. They have a moderate heat level and provide a bright and zesty flavor to the jelly.
Serrano Peppers: Serrano peppers are hotter than jalapeños, offering a more intense heat. They have a vibrant flavor that can add some complexity to your jelly.
When using spicier peppers like jalapeños, serranos, or even habaneros, keep in mind that the heat level of the jelly will increase significantly. Adjust the quantity of peppers to suit your taste preferences and the desired level of spiciness.
Experimenting with different pepper varieties can help you tailor the flavor profile of your green pepper jelly to your liking. You can also mix and match different peppers like I did in my recipe below to create a unique blend of flavors. Just remember to handle hot peppers with caution and take appropriate safety measures, such as wearing gloves and avoiding contact with your eyes or sensitive skin.
Now, that you made Hot Green Pepper Jelly, what do you do with it?
Green pepper jelly can be used in various ways, adding a unique sweet and savory flavor to both sweet and savory dishes.
Glaze for meat: Use green pepper jelly as a glaze for grilled or roasted meats. Brush it onto chicken, pork, or beef during the last few minutes of cooking to create a flavorful and caramelized glaze.
Dip or spread: Mix green pepper jelly with cream cheese, sour cream, or Greek yogurt to create a tangy and creamy dip. It’s great for dipping vegetables, pretzels, or even chicken nuggets.
Sandwich condiment: Spread green pepper jelly on sandwiches for a burst of flavor. It pairs well with both cold cuts and grilled sandwiches, adding a touch of sweetness and tanginess.
Salad dressing: Combine green pepper jelly with vinegar, oil, and seasonings to create a unique salad dressing. It works well with mixed greens, goat cheese, and nuts, providing a sweet and savory twist to your salads.
Glazed vegetables: Toss cooked vegetables like carrots, Brussels sprouts, or green beans with a little melted green pepper jelly. The jelly will coat the vegetables and give them a glossy glaze.
Marinade: Use green pepper jelly as part of a marinade for chicken, fish, or tofu. Combine it with other ingredients like soy sauce, garlic, and ginger for a flavorful and slightly sweet marinade.
Glazed fruit: Brush green pepper jelly onto grilled or broiled fruit like peaches, pineapple, or plums for a caramelized and flavorful glaze.
Unique gifts: Homemade green pepper jelly can make a thoughtful and unique gift. It’s a homemade condiment that showcases your culinary skills and creativity, making it a great option for sharing with friends, family, or as a host/hostess gift.
Preserving seasonal produce: If you have an abundance of green bell peppers or other peppers in your garden or local market, making green pepper jelly is a wonderful way to preserve and enjoy the flavors of the harvest year-round. It allows you to enjoy the taste of fresh peppers even when they are out of season.
These are just a few ideas to get you started. Feel free to experiment and get creative with how you use hot green pepper jelly in your favorite recipes.
Storing and Preserving Your Hot Green Pepper Jelly
Once your hot green pepper jelly is made and jarred, proper storage is a must for keeping it fresh. If you’ve used sterilized jars and followed proper canning procedures, your jelly can be stored in a cool, dark place for up to a year. Once opened, refrigerate the jelly and it will stay fresh for about 2-3 months. If you don’t plan to use it all at once, you can also freeze small portions for later use. Just thaw it in the fridge when you’re ready to enjoy more!
Remember, making green pepper jelly at home allows you to customize the recipe to your preferences, adjusting the level of sweetness or spiciness according to your taste. For a milder jelly, remove the seeds and membranes from the peppers, as this is where most of the heat is concentrated.
Are you ready to make a batch or two of hot green pepper jelly? Let’s do it!
10large assorted mild to hot peppersjalapeno, banana, anaheim, serrano, thai chili
2poblano peppers
2green bell peppers
1cupapple cider vinegar
5cupssugar
3tspsalt
1box pectin1.75 oz
Get Recipe Ingredients
Instructions
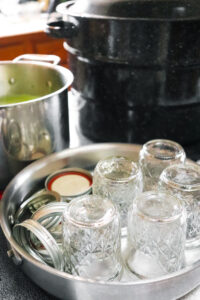
Fill canner with water, turn heat to high and allow this to heat up while prepping peppers. When it starts to boil, cover, and reduce heat until ready to add sealed jars.
Wash canning jars and lids.
Remove seeds from peppers.
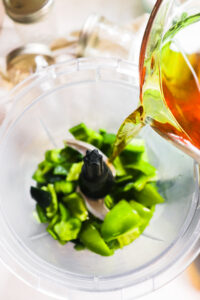
Roughly chop peppers and place half in blender.
Add half of apple cider vinegar and puree peppers.
Pour pepper puree into soup pot.
Repeat blending with remaining peppers and vinegar and add to pot.
Add salt and sugar to pot, stir to combine. Boil until sugar dissolves, approximately 5 minutes.
Reduce heat until candy thermometer shows 220°F. Sprinkle pectin in pepper mixture. Stir continuously so it doesn’t clump. Stir for 1-2 minutes. Turn off heat.
In large saucepan, filled halfway with water, heat clean jelly jars, upside down, and lids for 5 minutes. Make sure lids are in the water. Watch the jars as water can get sucked up inside, just use tongs to tip jars and release the water.
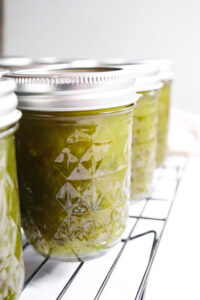
Carefully place hot jars and lids on paper towel to dry. Place canning funnel over jelly jars. Fill jars with pepper jelly mixture, leaving 1/2” space.
Wipe rim of canning jar to remove any liquid or debris. Secure lids, but do not over tighten.
Place jars in canner with tongs and make sure jars are completely covered with water. Bring water to boil again, cover and boil jars 10 minutes.
Use canner tongs to remove jars and place on cooling rack. Let sit overnight until cooled.
Listen for the pings that the jars have sealed. Gently press on the lids if you are unsure if they sealed, there shouldn’t be any bounce or give. Sometimes pressing will actually seal them.
Typically jars seal just fine when directions are followed.
Remove outer rims from jars as a precaution. This allows any contents to spill out if they did not seal properly and alert you to toss the contents in the garbage.
Write dates on jars and place in cool dry storage area.
Serve with cream cheese and crackers or use as a dip with tortilla chips
Have you ever made homemade jelly or jam before? What is one of your favorite recipes?
This post may contain affiliate links, please read our disclosure policy.
Dragon fruit is not only beautiful, it’s loaded with nutrients and health benefits. Thanks to it’s mild flavor, dragon fruit can be enjoyed in a variety of ways. Learn about dragon fruit and the discover ways to enjoy dragon fruit. While this post is sponsored Noble Citrus, all opinions and my love for produce is my own.
Are you all ready to try something a little exotic? I will admit, this is a new one for me…You typically see me chatting about all my favorite fresh from Florida fruits and vegetables. Well, Dragon Fruit is not from Florida. But it is a beautiful exotic fruit that is loaded with nutrients and is incredibly versatile.
What exactly is Dragon Fruit?
The dragon fruit, also known as pitaya, is a tropical fruit with a story that originates from Central America. While its exact origins are not entirely clear, it is believed to have originated in the region between southern Mexico and Guatemala. From there, the fruit spread throughout the Americas and eventually made its way to other parts of the world.
The dragon fruit is a unique-looking fruit with a vibrant, colorful exterior. It has a thick, scaly, and leathery skin that resembles the scales of a dragon, hence its name. The skin color can vary, ranging from bright pink or yellow to deep red or purple. Inside, the fruit is typically white or red with tiny black seeds scattered throughout.
According to legend, the dragon fruit’s captivating appearance and its association with dragons and mysticism led to various stories and beliefs surrounding its origin. Some tales describe how the fruit grew on the backs of dragons, and warriors would collect the fruit from the dragon’s lair. Others stories tell of ancient kings and queens who treasured the fruit for its exquisite taste and magical properties.
In reality, the dragon fruit is a product of various species of cacti in the genus Hylocereus and Selenicereus. These cacti produce large, night-blooming flowers that are pollinated by bats and moths. After pollination, the flowers develop into the dragon fruit, which takes around 30 to 50 days to ripen.
Dragon fruit gained popularity in Southeast Asia, particularly in countries like Vietnam, Thailand, and the Philippines. In recent years, it has become a trendy fruit worldwide, known for its refreshing taste, nutritional benefits, and eye-catching appearance. The fruit is rich in antioxidants, vitamins, and minerals.
It is used in a variety of dishes and beverages, including smoothies, salads, and desserts.
Are there different types of Dragon Fruit?
YEP! There are three main types of dragon fruit based on their flesh color: white, red, and yellow. Each type of dragon fruit has its own distinct characteristics and flavor profiles.
White Dragon Fruit: This is the most common type of dragon fruit. It has a vibrant pink or yellow exterior with greenish scales. The flesh of white dragon fruit is white, speckled with tiny black seeds. It has a mild, slightly sweet flavor with hints of kiwi and pear. White dragon fruit is often used in smoothies, salads, and desserts. This is the one pictured in this post, it is the one I can find easily in the grocery store.
Red Dragon Fruit: The red dragon fruit, also known as magenta or purple dragon fruit, has a vibrant red or deep magenta exterior with green scales. The flesh of the fruit is either white or deep red, depending on the variety. Red dragon fruit has a slightly sweeter taste compared to the white variety, with a flavor reminiscent of watermelon or a subtle blend of berries. It is often enjoyed fresh or used in various culinary creations. Many smoothie places use the variety with red flesh as it makes smoothies absolutely BEAUTIFUL….that deep color is just stunning in culinary creations.
Yellow Dragon Fruit: The yellow dragon fruit, also known as golden dragon fruit or yellow pitaya, has a bright yellow or golden exterior with green scales. The flesh of the fruit is usually white or pale yellow, dotted with black seeds. Yellow dragon fruit has a sweeter and milder taste compared to the other two types. It has a delicate flavor with hints of honey and citrus. Yellow dragon fruit is commonly eaten fresh or used in smoothies and tropical fruit salads.
What are some of the best ways to eat Dragon Fruit?
Scoop It: The simplest and most common way to enjoy dragon fruit is by eating it fresh and raw. Cut the fruit in half lengthwise and scoop out the flesh with a spoon. You can enjoy it as is or combine it with other fruits to create a colorful fruit salad.
Blend It: Dragon fruit can add a refreshing taste to smoothies and juices. Blend the flesh of the fruit with other fruits such as bananas, berries, or tropical fruits like mango and pineapple. You can also add a splash of coconut water or your favorite juice for added flavor and sweetness.
Freeze It: Dragon fruit can be used to create visually stunning and delicious desserts. You can use the flesh to make dragon fruit sorbet, popsicles, or even blend it into a creamy dragon fruit mousse. It can also be used as a topping for yogurt, ice cream, or chia pudding.
Dragon fruit can be a delightful addition to salads, adding both visual appeal and a unique flavor. Cut the fruit into cubes or slices and toss it into a salad with mixed greens, cucumber, avocado, and a light dressing. The mild sweetness and crunchy texture of dragon fruit complement the savory elements of a salad.
Dragon fruit is also great in cocktails or mocktails. Blend the fruit with ice, lime juice, and your choice of spirits for a refreshing dragon fruit cocktail. For a non-alcoholic version, mix the fruit with sparkling water, lime juice, and a sweetener of your choice.
Remember, dragon fruit’s flavor is relatively mild, so it pairs well with other fruits and ingredients.
What is one of your favorite way to enjoy dragon fruit?
Make sure to check out Food Wine Sunshine on Facebook, Twitter, Pinterest, and Instagram for more healthy living tips, healthy recipes, things to do and more.
This post may contain affiliate links, please read our disclosure policy.
Looking to try out the cottage cheese toast trend? Here are 10 delicious savory cottage cheese toast ideas you should try! While this post is sponsored by my Healthy Family Project family, my love for supporting brands that give back to the community is my own.
Savory Cottage Cheese Toast Ideas
I’ve been on a savory kick lately. My family loved all the savory waffle toppings I made a few weeks ago, so I decided to try another version. I am crazy late on jumping on the cottage cheese trend, but better late than never right? To be honest, I was a little hesitant….I mean, cottage cheese on toast?? Turns out, it’s delicious! I read that if you aren’t a fan of the chunks in cottage cheese you can blend it, but I decided the was too much effort and went with the traditional way. I mean, I topping it with other toppings, so I figured the chunks wouldn’t be a big deal.
They weren’t.
My Healthy Family Project team has an incredible campaign going on with Publix right now where the partnering brands are giving back 775,000 meals to Feeding America food banks in Publix areas. How amazing is that?? And Healthy Family Project does a campaign with Publix twice a year! That means their partners give back again! THANK YOU!
So, when I go to Publix, I look for signs like the ones below so I know I am supporting the brands that are giving back to Feeding America food banks in my area thanks to their partnership with Healthy Family Project.
On this Publix shopping trip, I grabbed Sunset Angel Sweet tomatoes, bell peppers and Marie’s Dressing. All of which were perfect topping for my cottage cheese toast. I actually used Wasa Crispbread instead of actual toast for my savory cottage cheese toast creations…they are a bit firmer than traditional toast so easier to eat in my opinion.
I did a little research on why this whole cottage cheese trend took off, so I decided I would share my findings with you all. At the end of the day, I will admit, I was pleasantly surprised and will definitely be making it again!
Why is cottage cheese toast trending?
Health-conscious choice: Cottage cheese is often perceived as a healthier alternative to other spreads or toppings. It is low in fat and calories, high in protein, and a good source of calcium.
Versatility: People enjoy experimenting with different toppings, such as fruits, vegetables, herbs, or spices, to enhance the flavor and texture of the toast.
Texture and creaminess: Cottage cheese has a unique texture that can be both creamy and slightly chunky. This texture adds a contrast to the crispness of toast.
Filling: Due to its high protein content, cottage cheese can help keep you feeling full and satisfied for longer periods.
Here are 10 popular savory toppings for cottage cheese toast:
Fresh Herbs: Sprinkle chopped fresh herbs like rosemary, basil, cilantro, or dill on top of the cottage cheese. This adds a burst of freshness and a subtle herby flavor. I had basil and rosemary in my garden, so I used those.
Tomatoes: Layer tomatoes on the cottage cheese. Tomatoes provide a juicy and tangy element to the toast. For an extra burst of flavor, add some fresh basil and balsamic glaze.
Cucumber Slices: Add some extra crunch and freshness by placing thinly sliced cucumbers on top of the cottage cheese. I drizzled Marie’s Zesty Secret Sauce Dressing on top of mine…Perfection.
Bell Pepper Slices: The sweet crunch is a delicious addition to the creamy cottage cheese. Top with some microgreens and a little balsamic glaze.
Avocado: Mash or slice ripe avocado and place it on the toast. It you mash it, layer that first then top with the cottage cheese.
Sliced Radishes: Thinly slice radishes offer a peppery and refreshing taste.
Smoked Salmon: For a more indulgent option, top your cottage cheese toast with thin slices of smoked salmon.
Sautéed Mushrooms: Cook sliced mushrooms in a little butter or oil until they are tender and golden.
Red Onion: Thinly slice red onions and toss them on the cottage cheese. The sharpness of the onion adds a zingy flavor to the toast.
Everything Bagel Seasoning: Sprinkle some everything bagel seasoning on top of the cottage cheese for a savory and aromatic blend of flavors. It typically includes sesame seeds, poppy seeds, garlic, onion, and salt.
Or do a combination of any of the above! One of my favorite savory cottage cheese toast combinations was the cucumber slice, Angel Sweet tomato, bell pepper slice and then the drizzle of Marie’s Zesty Secret Sauce.
Of course, you can do sweet cottage cheese toppings, any fruit and maybe some honey would probably be delish too!
Have you tried cottage cheese toast yet? What is one of your favorite toppings?
Be sure to check out HealthyFamilyProject.com for more than 600 registered dietitian-approved and family-tested recipes, meal planning tools, grocery store specific campaign details, and healthy tips from real parents and on Instagram, Facebook and Pinterest for even more!
Be sure to look out for those sponsors I mentioned above, YOU can be a part of the reason why 775,000 meals were donated! Do good, feel good, eat good 🙂
This post may contain affiliate links, please read our disclosure policy.
This article was originally published on Noble Citrus, but I knew you all would love it too, so here is how to freeze blueberries so you can enjoy in-season berries all year long.
Florida blueberry season starts in March and ends in May. That means we are officially at the end of Florida blueberry season…that means it’s time to stock up! I have been buying a bunch every time I go to the grocery store. I know you can get blueberries year round…you can’t get FLORIDA BLUEBERRIES year round. And you all know how I am a firm believer in supporting local and knowing where your food comes from. I like knowing mine comes from Florida. I like that my blueberries didn’t take days….or even weeks…to get to my local grocer. Do you have any idea how long some produce takes to get to you? The answer to that can be quite scary! So, while Florida Blueberry season is here – it’s time for me (and YOU!) to stock up!
Blueberries are considered one of the super foods. Blueberries are packed with a high content of antioxidants, fibers, vitamins A, C, and E and many other nutrients. These beautiful blue berries are beneficial to brain health because of the presence of anti-aging properties and anti-inflammatory effects. A diet that consists of these berries can also aid in the lowering of LDL cholesterol which could otherwise lead to strokes and cardiovascular diseases.
I know, I know….you can only eat so many fresh blueberries. But, did you know you can freeze fresh blueberries? Yes! It’s easy and the best way to guarantee that you have the freshest Florida blueberries whenever you want them. So when Florida Blueberry season is over, you can simply open your freezer and grab some of those beautiful blues.
Freezing blueberries is a great way to enjoy them all year long, and it couldn’t be simpler!
Equipment Needed to Freeze Blueberries
Baking sheet Parchment paper Freezer-safe container or bag Bowl
Here’s how to freeze blueberries:
Start with clean, dry berries. Rinse them gently if necessary and spread them out on a towel to dry.
Remove any stems or leaves and discard any berries that are moldy or damaged.
Place the berries in a single layer on a baking sheet lined with parchment paper. Freeze for about 2 hours, or until the berries are firm to the touch.
Once frozen, transfer the berries to a freezer-safe container or bag. Label and date the container, then store in the freezer for up to 9 months.
Enjoy your delicious, fresh-tasting Noble New Crop Florida blueberries all year long!
How to Thaw Frozen Blueberries:
There is no need to thaw frozen blueberries before using them. Simply add the desired amount of berries to your recipe and proceed as usual. The berries will thaw during the cooking or baking process.
If you’re adding frozen blueberries to a cold dish, such as yogurt or cereal, you may want to thaw them first so they’re not as hard and icy. To do this, place the berries in a bowl and let them sit at room temperature for about 15 minutes, or until thawed. Drain off any excess water before adding the berries to your dish.
When is the Best Time to Freeze Blueberries?
You can freeze blueberries at any time of year, but the best time is typically when they are in season and you are able to get them from a local farmer in Florida or the United States.
Blueberry Fun Fact
Blueberries are not actually blue when they’re ripe. They are a deep purple color and turn blue when they’re frozen. So don’t be alarmed if your berries look a little different after freezing them!
Health Benefits of Eating Blueberries
Blueberries are packed with nutrients and offer a host of health benefits. They’re an excellent source of fiber, vitamins C and K, and manganese. Blueberries are also low in calories and have a high water content, making them a great food for weight loss.
Ways To Enjoy Frozen Blueberries
Desserts
Frozen berries are excellent to satisfy our sweet tooth. I love adding them to my yogurt frozen as they freeze to it and make me feel like it’s ice cream 🙂 Frozen blueberries can be used in pies, tarts, muffins, and cakes. You can remove the berries from the freezer in advance so as to rid them of the excessive water. The thawing will prevent a soggy pie, etc. Try making a blueberry sauce on the stove; this could be used as a rich and heavenly topping for your favorite ice cream or pound cake.
Topping for breakfast/snack items
Instead of indulging in the store bought version which is loaded with sugar, you could make homemade jam. With a little touch of honey, this can be simmered on the stove-top until it produces a thick, sweet and delicious consistency. This spreadable jam could be used for toast, English muffins, you name it! Instead of a plain and boring pancake mix, toss and fold in a few thawed blueberries and give a delectable bite to your morning meal.
Drinks
Frozen berries are ideal for making smoothies. A handful could be tossed in a blender along with yogurt and some milk. This in itself makes for a great protein shake! Go ahead and get creative with some other ingredients too…blueberries pair beautifully with lots of fruits and veggies.
Best Recipes for Using Frozen Blueberries:
There are so many delicious recipes that you can make with frozen blueberries. Here are a few of our favorites:
No matter how you enjoy them, we hope you’ll take advantage of the health benefits and delicious taste of blueberries by incorporating them into your diet! Start enjoying this delicious fruit all year long!
If you have any questions about how to freeze blueberries or how to use them in recipes, feel free to leave a comment below. We’d love to hear from you!
This post may contain affiliate links, please read our disclosure policy.
Here are over 10 delicious savory waffle toppings, plus the perfect…and easy…way to make homemade waffles. Perfect for brunch, or any time of day! While this post is sponsored by Florida Milk, my love of yummy breakfast ideas and Florida Milk are my own.
When is the last time you made homemade waffles? I mean, like waffles from scratch? Yeah…it’s been awhile for me too. I means, it’s sooooo easy to just buy the boxed stuff and add water, right? Yes…it is. But, would you believe me if I told you that it’s cheaper, tastier and just as quick to make waffles from scratch.
One of my favorite weekend breakfasts is Eggs Benedict.
One of my favorite sandwiches is a Monte Cristo.
One of my kiddos favorite weekend breakfast is waffles.
So, I decided that it was time to combine some sweet and savory and create some delectable savory waffle toppings and share a deliciously easy homemade waffle recipe.
How exactly do you make waffles?
Well, that may seem pretty basic, so I’ll make this quick. Waffles are made from batter cooked in a waffle iron. The batter is poured onto one side of the heated waffle iron and then the other side is closed over it, cooking the batter between the two plates.
Waffles are usually made with a batter that includes flour, eggs, milk, butter, sugar, and baking powder.
Waffles can be served plain or with a variety of toppings, such as syrup, butter, fruit, whipped cream, chocolate chips, or nuts. Waffles are perfect for adding toppings due to their deep pockets.
What do you do if you have leftover waffles
What? GASP! Yes, it’s possible….
Waffles freeze well and can be stored in an airtight container or plastic bag in the freezer for up to 3 months. Reheat them in a toaster or oven for a quick breakfast or snack.
Use leftover waffles as the bread for a breakfast sandwich with bacon, egg, and cheese, or a sandwich with deli meat, cheese, and veggies. More ideas below 😉
Crumble leftover waffles into small pieces and use them as a topping for yogurt, oatmeal, or ice cream.
Use leftover waffles as a substitute for breadcrumbs when making chicken fingers or fish sticks.
Cube leftover waffles and mix with eggs, milk, sugar, and vanilla extract to make a bread pudding. Bake in the oven until golden brown and serve warm with whipped cream or ice cream.
Why waffles are perfect for brunch
Waffles are often perfect for brunch because they are easy to make and can be dressed up with a variety of sweet or savory toppings.
Why we always serve milk with our waffles
Milk complements the rich and buttery taste of waffles.
Milk is a good source of protein, calcium, and other essential nutrients, making it a healthy and filling addition to any meal.
Milk is AMAZING. Enough said 😉
Best Savory Waffle Topping Ideas:
Eggs Benedict – Canadian Bacon, egg and hollandaise sauce – I used the package hollandaise sauce that is made with milk and butter
Cottage Cheese with roasted asparagus, sweet onions and everything bagel seasoning
Monte Cristo – I used Canadian Bacon, Swiss cheese and raspberry jam
Avocados, tomatoes, sliced jalapeno, and fresh cilantro
Mac n cheese, chicken and BBQ sauce
Chili and shredded cheese…don’t forget the jalapenos slices!
Chicken and maple syrup/hot honey
Cream cheese and fresh veggies
Waffles can be served as a spin on a classic breakfast sandwich, topped with bacon, eggs, and cheese.
A savory twist on the traditional biscuits and gravy, waffles can be served with sausage and a creamy gravy.
Top waffles with smoked salmon, cream cheese, and capers.
Creating a Full Meal with Savory Waffles
For a complete and balanced meal, add a side of crispy roasted vegetables or a fresh green salad with a light vinaigrette. And don’t forget some fresh fruit!
Alright, now that we know why you should waffles, how to store waffle leftovers and have shared over 10 incredibly scrumptious savory waffle toppings, let’s go ahead and share exactly how to make the BEST HOMEMADE WAFFLES. So easy too…
Ok, here’s my best homemade waffle recipe. I put that it make 8 servings because these are the big waffles…we couldn’t eat more than a hlaf of a waffle, especially when we topped then with our savory waffle topping of choice 🙂
In a medium size bowl, mix together all the dry ingredients.
In a small/medium bowl, mix together all the wet ingredients. Mix well.
Pour the milk/egg mixture into the flour mixture. Whisk.
Preheat your waffle maker as directed.
Pour large spoonfuls onto greased waffle iron until mostly full.
Close the lid and cook for about 3-5 minutes or until golden brown or as directed.
Top with your favorite toppings.
Serve with a glass of cold milk.
Enjoy!
Notes
Pro Tips: Don’t overmix the batter, you should have some lumps! Don’t use a standard cooking spray, I used olive oil spray.This recipe will make 4 large waffles, we were only able to eat a 1/2 waffle each, which is why the servings is 8.
And while you are at it, check out all the recipes on Food Wine Sunshine and follow on me Facebook, Twitter, Pinterest and Instagram for more FOOD WINE AND SUNSHINE.
This post may contain affiliate links, please read our disclosure policy.
Check out this gin fun facts and trivia! Who knew gin had so much history and was used for so many different things!
You don’t have to be a mixologist to understand the allure of gin. It’s perfect for warm afternoons spent outside, and just as good for cozy ones next to the fire. This dynamic drink is suitable for anyone’s taste, and it has been for centuries.
But it’s not just the spirit’s complex and diverse flavor profile that makes it so gin-tresting! Here are a few fun facts about gin that you probably didn’t know.
Medicinal Ori-Gins
Before gin formed part of many a beloved cocktail, it was used to treat a variety of ailments. In the 17th century, a Dutch professor of medicine, Franciscus Sylvius, distilled juniper berries with other spirits to create a cheap medicine. The result was gin, which was then prescribed for kidney ailments, gout, and gallstones.
It’s not just the spirit that has its origins in medicine, but also its famous cocktail pairing: gin and tonic! In fact, many of the mixers that we pair with alcohol have medicinal origins, including soda water and ginger ale.
Gin was first mixed with tonic during the British colonial period in India. A Scottish doctor, George Cleghorn, discovered that the quinine in tonic was effective against malaria. Because tonic water is quite bitter, people began adding gin and then lemon and lime to create what we now know as the classic gin and tonic.
So, next time you’re drinking gin and tonic, you can tell your friends it’s medicinal!
From Medicine To ‘Mothers Ruin’
The medicinal purpose of gin soon turned into something more menacing as the spirit grew in popularity.
British soldiers were first introduced to gin during the Dutch War of Independence. Fighting on the side of the Dutch, the soldiers encountered the spirit in Antwerp while battling the Spanish. Traveling British soldiers then brought the spirit home with them, where it became a favorite amongst the working class.
At the time of its introduction, levies on French brandy had been increasing due to ongoing hostilities between the British and the French; making gin a cheaper option.
The low-cost and high potency of the drink led to its excessive consumption in 18th-century England, with hefty social consequences. This period became known as the ‘Gin Craze’.
The craze led to the British parliament passing acts specifically designed to control the consumption of gin. It had caused the greatest public concern compared to any other alcohol and was thus dubbed ‘mothers ruin’.
A Spirit Of Many Names
What’s in a name? That which we call gin, by any other name, would taste as sweet.
It’s true, gin has taken on many names in its long lifetime. The spirit was first called ‘genever’ after the Dutch word for juniper, which is the key botanical used in the drink. It’s also called ‘juniper juice’ as a result.
Interestingly, the juniper berry is not a real berry, but is a type of seed cone with fleshy scales that gives the appearance of a berry.
‘Bathtub gin’ refers to homemade gin during the prohibition in the United States in the early 1900s. The gin was in a bottle so tall that it had to be filled in a bathtub rather than in a sink! Today, there is a brand of gin still called bathtub gin!
Dutch Courage
It’s also thanks to gin that we have the phrase ‘Dutch courage’.
When fighting in the Dutch War of Independence, British soldiers would consume gin before the battle. They found that the spirit helped to calm their nerves and began referring to the consumption of gin as ‘Dutch courage’.
The British fascination with gin led them to make their own version of genever, which they shortened to what we know today as ‘gin’.
Gin Comes In Many Varieties
Gin is a broad category of spirits, encompassing many different styles and types. Each has its own unique flavor profile and characteristics.
Some of the more popular types of gin include:
London Dry: No other gin has as strong juniper notes as London Dry gin. The flavor profile consists of citrus zest, candied angelica stalk, and licorice. London Dry gin creates a classic base for every gin cocktail.
Old Tom: This gin is also flavored with juniper. What makes it stand out is its light, malty, and soft flavor profile. Old Tom is sweeter and less botanical than most other gins.
Plymouth: This gin has a long, spicy, and fruity finish with hints of tangy juniper oil, coriander seed, and pepper. Plymouth is a subtle gin without the usual bitter botanicals and is similar to London dry gin.
Genever: The original form of gin, Genver is malty and tastes like a blend between gin and light scotch whisky. Genever is aromatic and smooth. It’s still popular in parts of the Netherlands, Belgium, France, and Germany.
Gin Is Made From Botanicals
Juniper berries, coriander, angelica root, and citrus peels are common botanicals used in gin. They’re what gives the drink its unique flavor and aroma. The botanicals infuse into the spirit to release their flavors.
Some gins include more unusual botanicals, like cucumber, rose petals, elderflowers, and lavenders. Many qualified bartenders also use their drinks knowledge to make their own botanical-infused gins or gin-based drinks using herbs, flowers, spices or fruit.
Gin Is A Food-Friendly Spirit
Red wine with cured meats and white wine with prawns are common food and alcohol pairings. But it’s rare to find a good food and spirit pairing.
The versatility of gin makes it a better spirit than vodka or bourbon to pair with food. The distillation of gin can suit any herb and can therefore easily align with dishes that match its flavor profile. The flavors found in gin also get closer to food than any other spirit.
Some mouthwatering gin and tonic food pairings include:
Gin and Charcuterie: The herbal flavors found in gin pair well with charcuterie meats infused with herbs. Think fennel salami, duck prosciutto, and porchetta!
Gin and Cheese: Strongly flavored cheeses seasoned with herbs pair well with gin and tonics.
Gin and Nuts: The saltiness and fattiness of nuts go well with gin and tonic. Pick between peanuts, cashews, pistachio, hazelnuts, and almonds for a satisfying pairing.
From a medicine to a war-time tonic, to a drink infused with some of nature’s best, gin hasn’t just stood the test of time. It’s flourished!
This post may contain affiliate links, please read our disclosure policy.
Made with only a few ingredients and ready in less than 30 minutes, this blueberry soup is the perfect way to celebrate summer and enjoy blueberries! While this post is sponsored by Florida Milk, my love of blueberries and Florida Milk and this recipe are my own.
Healthy Blueberry Soup
The weather has officially warmed up and some of my favorite Florida produce is in season…that means I am stocking up every time I head to the store. Right now, Florida blueberries are in season and I had about 8 containers in the house. I love snacking on them, tossing them in smoothies, and on top of yogurt. But, yes…8 containers is a lot. I also have two gallons of Florida milk in the refrigerator because my son picked up one and I picked up one. I also have two huge containers of nonfat Greek yogurt.
So…what did I do with all that goodness? I made blueberry soup! I absolutely HATE wasting food. It is one of my biggest pet-peeves for sure. Now, yes, I could totally freeze the fresh blueberries, but why not get a little creative in the kitchen and use some of that extra Florida Milk and Greek yogurt too?
I know it may seem like a small step towards reducing food waste, but every little bit matters. Reducing food waste is a crucial step towards creating a more sustainable food system that benefits us and the environment. By reducing waste, we can conserve resources, save money, and address food insecurity while also mitigating the impacts of climate change.
Being sustainable means making decisions and taking actions that minimize negative impacts on the environment, society, and the economy, while also ensuring that resources are used in a responsible and efficient way. Sustainability involves balancing the needs of the present with the needs of future generations, and recognizing that economic growth, social equity, and environmental protection are interconnected and mutually dependent.
Looking for an example of who is sustainable? Look to farmers. I have had the opportunity to visit a Florida Dairy Farm several times and each time I am just in awe about what they do to care for not only their animals, but the land itself. Learn more about the Milking R Dairy Family Farm and out visit here on Instagram, owner Sutton Rucks talks about how he works for the cows…they don’t work for them and so much more.
Being sustainable involves making conscious choices that prioritize the long-term health and well-being of both the natural environment and society, while also ensuring economic viability. Which is something Florida Dairy Farmers do every single day.
What exactly is blueberry soup and why should you make it?
Blueberry soup is a traditional dish in Nordic countries, particularly in Finland and Sweden, where it is often served as a dessert or snack.
The basic recipe for blueberry soup typically involves cooking fresh or frozen blueberries with sugar, water or juice, and sometimes a thickener such as cornstarch or potato starch. The mixture is then pureed or mashed to create a smooth soup-like consistency. Other ingredients that may be added to blueberry soup include cinnamon, cardamom, lemon juice, or other fruits. Some variations also include cream or sour cream for a richer flavor and texture. Blueberry soup can be served hot or cold, depending on personal preference.
I put my own healthy spin on this blueberry soup recipe by leaving out the sugar and adding in Florida milk and nonfat vanilla Greek yogurt.
In hot weather, chilled soups provide a refreshing and cooling option.
Chilled soups can be a great way to get a variety of nutrients, as they often contain a lot of fresh fruits and vegetables.
Chilled soups are often made with raw or lightly cooked ingredients, which can be easier for the body to digest than heavier, hot meals.
Chilled soups can be made ahead of time and stored in the refrigerator for several days, making them a convenient option for busy schedules or for those who prefer meal prep.
Milk is a nutritious beverage that contains a range of essential nutrients that are important for overall health. Milk is a rich source of calcium, which is essential for strong bones and teeth. It is also a good source of protein, which is important for building and repairing tissues in the body. Milk contains a variety of vitamins and minerals, including vitamin D, vitamin B12, phosphorus, and potassium and it’s a good source of hydration. Milk is also a source of vitamin B12 and protein…Do you need any other reasons to love milk?? Ok, one more…it tastes great 😉
Why I love blueberries
Oh, let me count the ways! Blueberries have a unique combination of sweetness and tartness.
Blueberries can be eaten on their own as a snack, or used as an ingredient in a variety of dishes, including baked goods, smoothies, cocktails and soups.
Blueberries are considered a superfood because they are low in calories and high in nutrients, including antioxidants, fiber, and vitamin C.
Ok, let’s make some blueberry soup! Now remember, you can serve it hot or chilled, but I will admit, I prefer it chilled and that’s how I put it in the recipe.
Looking for a healthy and nutritious way to use all those in-season blueberries and milk? I got you! This blueberry soup is ready in under 30 minutes and is perfect for breakfast, brunch, a snack or dessert!
Prep Time5 minutesmins
Cook Time15 minutesmins
Chill time10 minutesmins
Total Time30 minutesmins
Course: Breakfast, Breakfast or Dessert, Breakfast or Snack, Breakfast/Brunch, Brunch
12ozfresh blueberries 2 small containers. I used Noble New Crop Florida blueberries
1/2tsp.cinnamon
1/4tsp.fresh gingerminced
1cupwhole Florida milk
1cupnonfat Greek yogurt I used the zero sugar vanilla variety
fresh mint and almond slivers for garnishoptional
Get Recipe Ingredients
Instructions
Bring water to a boil in a saucepan. Stir in the blueberries, cinnamon, and ginger.
Boil for 3 minutes, stirring occasionally.
Reduce heat and simmer for 10 minutes.
Remove from heat and allow to cool.
Add milk and yogurt to the cooled blueberry mixture and using an immersion blender, blend until smooth. *If you don't have an immersion blender you can use your favorite blending device.
And while you are at it, check out all the recipes on Food Wine Sunshine and follow on me Facebook, Pinterest and Instagram for more FOOD WINE AND SUNSHINE.


