Blog

The Blue Frosted Snowflake Cocktail

This post may contain affiliate links, please read our disclosure policy.

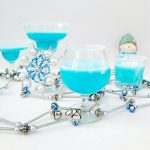
This Frosted Snowflake Cocktail is not only pretty, but it tastes amazing!  Serve up this Frozen Snowflake Christmas Cocktail all season long…and beyond. While this post is sponsored by Florida Dairy Farmers, all opinions and my love of dairy and cocktails are my own.

Florida Snowflake Vodka Cocktail

Frosted Snowflake Cocktail

In Florida, we don’t get the chance to see many snowflakes, so I decided to create some.  In my favorite form…a cocktail.  When I think of winter, I think of snow and the need to warm up!  And what better way to warm up than with a cocktail or two.  Not just any cocktail, my Florida Frosted Snowflake. 

One of my favorite things about this cocktail is the color, how beautiful is that blue?!  The blue color with the white ice cubes makes for a colorful and festive cocktail.  The blue is made possible due to Blue Curaçao.  The white ice cubes are made possible due to milk.  What?  Yep.  I used Florida milk in my Frosted Snowflake cocktail and using milk for the ice cubes just seemed natural!  The white colored ice cubes is perfect for the vodka cocktail and when the ice cubes melt, they won’t water down your drink.  No one likes a watered down cocktail.

Frozen Inspired Vodka Cocktail

If you are looking to host a cocktail party this holiday season with friends and family, there are some basics of cocktail making and ingredients that are essential to know in order to create the perfect drinks, this Frosted Snowflake Cocktail included.

The vibrant blue color and the overall presentation make this cocktail fun and festive. It can be a great addition to celebrations, parties, or special occasions.

Frozen Snowflake Cocktail

Obviously, the Frosted Snowflake Cocktail will be on the drink menu, but you will want to have a few other essentials on hand for making additional drinks and you may want to know a little history about cocktails themselves…everyone appreciates a knowledgeable host(ess).

Most etymologists believe that the word ‘cocktail’ derives from the word ‘coquetel’ which is a French wine based drink. Mixed drinks have been around since ancient times and cocktails in some form or another since the sixteenth century. They became fashionable again during the 1920s as bootleg alcohol tasted so foul that it had to be mixed with a variety of other ingredients to make it palatable. Cocktails enjoyed a second wind in the 1970s as a plethora of new ingredients and spirits from around the world became available.

Today cocktails enjoy a permanent place on the menu in almost every bar and hotel.

It would take a lot of money and time to have a pantry stocked with every ingredient you could possibly need for every cocktail but there are some added extras which are used in a lot of cocktails that are worth having.

Best Frozen Snowflake Cocktail

Basic Cocktail Ingredients

  • Salt, pepper and chili powder (yes really!)
  • Simple syrup. This can be made by dissolving 4 tablespoons of water and 4 tablespoons of sugar in a small pan then bring to the boil for two minutes. Cool fully before using it and keep in the refrigerator.
  • Bitters
  • Worcestershire sauce
  • Lemon, glace or maraschino cherries, orange, lime, olives and cocktail sticks for decoration
  • Commonly used mixers: soda water, ginger ale, tonic water, cola, lemonade, orange juice and cranberry juice
  • Commonly used alcohol: white wine, sparkling wine/ champagne, vodka, rum, brandy, scotch whisky, bourbon, triple sec, vermouth, tequila and gin

The most sensible option is to choose two or three cocktails you might like and stock for those. To stay economical try to choose cocktails with the same alcoholic base.

Tasty Frosted Snowflake Cocktail

Basic Cocktail Making Equipment

As James Bond says “shaken not stirred”. Two of the most important pieces of equipment are a shaker and a stirrer.

  • A shaker is most often in a bottle style shape with two lids. The inner lid is perforated and on top of it goes a real lid. This allows the cocktail ingredients and ice to be shaken together then the cocktail poured out through the inner lid leaving the ice behind.
  • A stirrer is simply a long handled spoon.
  • A mixing glass is usually a wide rimmed jug made of clear glass in which cocktails can be stirred.
  • Measuring cups/spoons, a zester, a corkscrew, a bottle opener, a sharp knife and a chopping board all come in handy as well.
Best Frosted Snowflake Cocktail

The cocktail ingredients you need for the Frosted Snowflake are:

  • Milk/Cream
  • Vodka
  • Blue Curaçao
  • Creme de Cacao
  • Sugar for the rims of the glasses
Tasty Frosted Snowflake Cocktail

The equipment you need to make the Frosted Snowflakes are:

  • Ice cube trays
  • Cocktail Shaker
  • Glasses
  • Plates/Bowl so you can make the sugar rims

What is Blue Curaçao?

Blue Curaçao is a citrus flavored liquor. Simply put, blue curaçao is curaçao liqueur, colored blue with food coloring. It’s that vibrant blue color that makes it popular in cocktails and festive drinks, like my Frosted Snowflake Cocktail. Blue Curaçao does have lower alcohol percentage than the original Curaçao. Blue Curaçao has an alcohol percentage between 20% and 25%. Blue Curaçao is a citrus flavored liquor.

What is Creme de Cacao?

Crème de Cacao is a sweeter chocolate bean flavored liqueur, usually flavored with a hint of vanilla. It is not the creamy chocolate liqueur that you may be thinking of, Crème de Cacao is lighter and not as sweet. Crème de Cacao does come in two varieties, dark and white (which is actually clear). I used the clear variety in this Frosted Snowflake Cocktail so that the blue color would be the dominant color.

What is Vodka?

While I am sure you have had a vodka cocktail, did you know that a liquor usually made from fermented grains and potatoes? Vodka has a standard alcohol percentage of 40% ABV in the US, but it is originally from Russia, Poland and Sweden. Because of vodka’s subtle flavor, it easily takes on the character of a drink, which is also why you see so many different flavors of vodka. Vodka mixes well with almost anything! In this Snowflake Cocktail I used a “well vodka” (not the most expensive one of the shelf) because I am using several other flavors, so vodka didn’t need to be the star of the show.

Why use cream or milk in a cocktail?

Using cream or milk in a cocktail makes it decadent. A milk or cream cocktail is a nice treat, and there are so many flavor possibilities, from the infamous White Russian to the Creamy Butterscotch Martini to chocolate cocktails to fruity martinis. Sometimes, a small amount of cream or milk with add that rich texture you are looking for when creating a creamy cocktail.

When creating a dairy cocktail make sure you are using fresh dairy. Make sure your cream or milk isn’t expired, sour milk will sour your cocktail. Be sure to serve your creamy cocktail right after mixing them.  I recommend using Florida Milk.

Frosted Snowflake Vodka Cocktail


If you were wondering what Elsa from Disney’s beloved movie Frozen would order at your next social gathering, look no further! The answer is clear (or should we say frozen?)– the perfect cocktail for our ice queen is our Frosted Snowflake Cocktail.

This cocktail serves as a base for creativity. You can customize the sweetness, adjust the ratios, or even experiment with garnishes to tailor it to your taste preferences.

Ok, so let’s get a shaking! Here is how you make my beautifully blue Frosted Snowflake Cocktail. Be sure to Print It and Pin It so that you can make them again and again.

Remember to drink responsibly, and feel free to adjust the ingredient proportions based on your personal preferences to make this cocktail truly your own.

Frosted Snowflake Cocktail

This Frosyed Snowflake Vodka Cocktail will warm you up this winter! Prepped in just a few minutes, this beautiful blue cockatil will be loved by all.
Prep Time3 minutes
Course: Cocktail
Keyword: alcohol, christmas, christmas cocktails, cocktails, creamy cocktails, drinks, holiday cocktails, vodka
Servings: 4
Author: Tracy

Equipment

  • Ice Cube Trays
  • Cocktail Shaker

Ingredients

  • 1/2 cup 2% milk or half and half
  • 1/2 cup vodka
  • 1/2 cup blue curacao
  • 1/2 cup white (clear) creme de cacao

Milk Ice Cubes

  • 2% milk or half and half for ice cubes

Sugar Rim

  • sugar
  • water

Instructions

Milk Ice Cubes

  • The night before creating your cocktails, fill desired ice cube tray(s) with milk or half and half. I used a whiskey cube tray for big milk cubes and a mini ice cube tray for the mini milk cubes.
  • When you are ready to make the cocktails, place ice in a cocktail shaker.
  • Sugar rim desired cocktail glasses (to do this simply wet the rim of a glass and twist it in sugar, I put water on one plate and sugar on another and simply twist the glass in one then in the other).
  • Place desired amount of preferred milk ice cubes into each glass.
  • Pour all the liquid ingredients into the cocktail shaker.
  • Give them a good shake!
  • Strain the frosty blue snowflake cocktail into prepared cocktail glasses.
  • Cheers!
Florida Snowflake Blue Cocktail

I hope you enjoy these Frosted Florida Snowflake Cocktails as much as we do!

So, does this vodka cocktail remind you of Elsa from Frozen?  When I showed the pictures of two of my good friends, that’s what they thought of immediately!  I guess it’s been a few years since I watched the movie, but now that I think about it, I can totally see that!  So, when you make my Florida Frosted Snowflake at home, feel free to call it Elsa’s Frosted Snowflake for all of the Frozen movie fans in your life.

Florida Snowflake Vodka Cocktail

What is one of your favorite Christmas Cocktails? Have you used milk in cocktails before?

Be sure to check out Florida Milk for more dairy-licious recipes and follow on Instagram, Facebook and Pinterest.

And while you are at it, check out all the healthy recipes on Food Wine Sunshine and follow on me Facebook, Twitter, Pinterest and Instagram for more FOOD WINE AND SUNSHINE.

Easy Christmas Sugar Cookies

This post may contain affiliate links, please read our disclosure policy.

Easy Christmas sugar cookies made in just 20 minutes! This classic holiday sugar cookie recipe is perfect for decorating, gifting, and baking with kids.

Easy Christmas Sugar Cookies


These easy Christmas Sugar Cookies are a must-have in our family every single holiday season. In just 20 minutes, you can have about 30 soft, delicious sugar cookies ready to enjoy and decorate. Nothing says the holidays quite like festive baking, colorful icing, and classic Christmas cookies.

Holiday Baking with Family

Holiday baking time is officially here! Do you bake a variety of Christmas cookies each year? For as long as I can remember, we’ve made dozens of cookies, packaged them up, and delivered them to friends and family throughout our neighborhood. Delivering Christmas cookies is one of our favorite ways to spread a little holiday cheer.

These Christmas sugar cookies are my kids’ absolute favorite cookies to make, mostly because they love decorating them. Or maybe it’s because they love licking the icing spoons. Either way, I love that they get involved and make memories in the kitchen during the holidays.

Best Christmas Sugar Cookies

Why We Love These Christmas Sugar Cookies

Christmas sugar cookies are a holiday baking essential. There’s just something nostalgic about using festive cookie cutters and decorating classic shapes. Honestly, what says Christmas more than a decorated Christmas tree or stocking-shaped sugar cookie?

These cookies are:

  • Soft and classic
  • Easy to make with simple ingredients
  • Perfect for decorating with kids
  • Great for gifting and cookie exchanges

Ingredients for Christmas Sugar Cookies

To make these old fashioned Christmas sugar cookies, you’ll need simple pantry staples along with:

  • Butter
  • Eggs
  • Buttermilk

Nothing fancy, just easy, reliable ingredients that come together beautifully every time.

How to make sugar cookies

How to Make Christmas Sugar Cookies

Prep Time

Prep time for these holiday sugar cookies is about 10 minutes…that is, if you’re focused. If kids are helping, throw that timer out the window and let them enjoy the process. Holiday baking is about fun, not perfection.

Baking Time

Bake the cookies for 10–12 minutes, depending on size and thickness. Be sure to let them cool completely before decorating, you definitely don’t want the icing to melt.

Easy Christmas sugar cookies decorated for the holidays on a baking sheet with parchment paper

No Cookie Cutters? No Problem

If cookie cutters feel like one more thing during an already busy holiday season, you can absolutely keep these Christmas sugar cookies simple. Rolling the dough into balls and gently flattening them into classic round sugar cookies works perfectly and still gives you soft, delicious cookies every time. This option is especially great if you’re baking with kids, short on time, or just want a no-fuss holiday cookie that’s easy to ice and decorate. As you can see, round sugar cookies are just as festive with a little icing and holiday-colored drizzle… and honestly, they disappear just as fast.

Christmas sugar cookies served with a glass of milk for a classic holiday treat

Tips for Perfect Christmas Sugar Cookies

These easy Christmas sugar cookies are very forgiving, but a few simple tips will help ensure they turn out soft, evenly baked, and perfect for decorating every time.

Don’t overmix the dough
Once the dry ingredients are added, mix just until combined. Overmixing can make sugar cookies dense instead of soft and tender.

Roll the dough evenly
Keeping the dough an even thickness helps the cookies bake evenly. If some cookies are thinner than others, they may brown too quickly around the edges.

Chill the dough if needed
If your dough feels too soft or sticky, pop it in the refrigerator for 20–30 minutes before rolling. This helps prevent spreading and keeps cookie shapes crisp.

Watch the bake time closely
Sugar cookies should look set but not browned. Remove them from the oven when the edges are just barely golden for soft, classic Christmas sugar cookies.

Cool completely before decorating
Let the cookies cool fully before icing. Decorating warm cookies can cause the icing to melt and slide off, which makes decorating much less fun, especially for kids.

How to make Christmas sugar cookies

Decorating Your Sugar Cookies

Once cooled, it’s time for the best part: decorating! Use your favorite icing and festive sprinkles to bring these cookies to life.

Old Fashioned Christmas sugar cookies recipe

This recipe makes about 30 cookies, but feel free to double the batch if you’re baking for a crowd or planning to share.

Old Fashioned sugar cookies

This easy sugar cookie recipe is one you’ll want to make year after year. Be sure to print it and pin it so it’s ready for this holiday season…and many more to come.

Christmas Sugar Cookies

These easy Christmas sugar cookies are soft, classic, and perfect for decorating. Made with simple pantry ingredients, this old fashioned sugar cookie recipe comes together in just 20 minutes and makes about 30 cookies – ideal for holiday baking with family.
Prep Time15 minutes
Cook Time10 minutes
Course: Dessert
Cuisine: American
Keyword: christmas, cookie, cookies, desserts, holidays
Servings: 30
Calories: 115kcal
Author: Tracy

Equipment

  • Mixer
  • Stove

Ingredients

  • 1 1/2 cups granulated sugar
  • 1 cup salted butter room temperature
  • 2 eggs
  • 1/2 tsp salt
  • 2 tsp baking powder
  • 1/2 cup buttermilk
  • 1 tsp vanilla
  • 1/2 tsp almond extract
  • 4½ – 5½ cups all-purpose flour
  • Powdered Sugar

Instructions

  • Preheat oven to 400° F
  • Prepare 2 baking sheets and set aside
  • With a mixer cream together sugar and butter for 3 minutes or until fluffy
  • Add eggs and mix again
  • Add salt, and baking powder then blend
  • Blend in ¼ cup buttermilk, vanilla and almond extract
  • Add ½ cup of flour at a time until all 2 ½ cups of flour have been added
  • Add remaining ¼ cup buttermilk and mix
  • Then add the remaining 2 cups of flour. The batter should be smooth, elastic-like and slightly sticky. If too sticky, add more flour a little at a time (up to 1 cup – be careful to not put TOO much flour in the dough)
  • When ready to roll out, sprinkle the surface with powdered sugar
  • Using a rolling pin, roll dough to ¼ in thickness
  • Using cookie cutters, cut out your favorite shapes and transfer to prepared cookie sheet
  • Bake 10-12 minutes until the edges just start to get a hint of golden brown, making sure to not overcook
  • Allow cookies to cool completely then frost as desired
  • Enjoy and be sure to share with others!

Notes

Happy Holidays!

Nutrition

Calories: 115kcal | Carbohydrates: 13g | Protein: 1g | Fat: 7g | Saturated Fat: 4g | Polyunsaturated Fat: 0.3g | Monounsaturated Fat: 2g | Trans Fat: 0.2g | Cholesterol: 28mg | Sodium: 124mg | Potassium: 16mg | Fiber: 0.1g | Sugar: 10g | Vitamin A: 212IU | Calcium: 24mg | Iron: 0.3mg
Tasty christmas sugar cookies

I hope you and your family enjoy these Christmas Sugar Cookies as much as we do!

Christmas sugar cookie lifted with a spatula, decorated with holiday-colored icing

You can use store bought icing to decorate your sugar cookies or make your own.  Making your own icing is incredible simply, you just need powdered sugar and milk.  Yep, that’s it.

Red and green icing for decorating Christmas sugar cookies

To make your own Sugar Cookie Icing:

Mix 1 cup of powdered sugar and 4 tablespoons of milk.  Adjust milk as needed.  Add food coloring if desired.

Told you it was easy!

Tasty sugar cookies

How to Store and Freeze Christmas Sugar Cookies

These old fashioned Christmas sugar cookies are great for making ahead, storing, and even freezing—perfect for busy holiday schedules.

Storing baked sugar cookies
Once baked and completely cooled, store undecorated or decorated sugar cookies in an airtight container at room temperature for up to 5 days. Place parchment paper between layers to keep decorations intact.

Freezing baked sugar cookies
Baked sugar cookies freeze beautifully. Allow them to cool completely, then store them in a freezer-safe container or bag for up to 3 months. For best results, freeze cookies without icing and decorate after thawing.

Freezing sugar cookie dough
You can also freeze the dough ahead of time. Wrap the dough tightly in plastic wrap and place it in a freezer-safe bag. Freeze for up to 3 months. When ready to use, thaw in the refrigerator overnight, then roll, cut, and bake as directed.

Make-ahead holiday baking tip
Freezing dough or baked cookies is a great way to spread out holiday baking and reduce stress during the busiest time of year.

Soft Christmas sugar cookie with white frosting and festive red and green drizzle

What is one of your favorite holiday cookie recipes?

Best sugar cookies recipe

Be sure to check out all the delicious recipes on Food Wine Sunshine and follow on me Facebook, Twitter, Pinterest and Instagram.

Top Things To Do In Perthshire Scotland

This post may contain affiliate links, please read our disclosure policy.

When planning your travel itinerary to Scotland, be sure that Perthshire Scotland is a part of your travel plans.  These Top Things To Do In Perthshire Scotland will have you falling in love with Perthshire.

Top Things To Do In Perthshire Scotland
Image Credit Perthshire

Top Things To Do In Perthshire Scotland

Perthshire isn’t called the Big County of Scotland for no reason. It boasts a sizeable collection of delights for visitors of all ages. Rivers and lochs? Yep. Mountains with superb views across Perthshire? Definitely. Shops, distilleries, and castles? Oh, yes.

I have dreamed of visiting Scotland one day and with so many amazing places to visit, it may be overwhelming to decide where to visit while in Scotland.  So if you are planning a trip to Scotland, be sure to read these Top Things To Do In Perthshire Scotland from someone who lives in Scotland.  This travel post on Perthshire is brought to us by Graham Grieve at My Voyage Scotland.  Graham is a Scottish travel blogger who has spent the past 27 years traveling Scotland’s smaller towns and cities

Graham has collated a few of his favorite activities, attractions, and destinations to check out in Perthshire. I’m confident you’ll find something here to try or to visit. Which ones appeal most?

Best Things To Do In Perthshire Scotland
Image Credit Ben Vrackie

Take a Perthshire Trek to Ben Vrackie

Bagging your first Perthshire mountain is a major event. If you’re new to it, though, a safer way to bag your first peak is via a guided trek.

You’ll need to prepare for this walk as it is around 10.5 miles long. It also has 950 metres to ascend to reach the summit. This is a full day’s challenge lasting around seven hours.

However, you will tackle part of Rob Roy Way on your way to the mountain. Starting in Pitlochry, you’ll approach the Ben, eventually reaching the top and enjoying superb views from the summit. Then it is time to experience the pass of Killiecrankie, perhaps best known for its gorge.

You’re guaranteed amazing views throughout. This is one for the photographer in you.

A good start is essential for any Scottish mountain. Check out this Pitlochry Accommodation Guide for places to stay that are literally on Ben Vrackie’s doorstep.

Things To Do In Perthshire Scotland
Image Credit Tay Forest Park

Hit the rapids in Aberfeldy

Are you enough of a water baby to try this? The white-water rafting experience offered by Splash takes place all year round (you hardly need good weather, do you?). See the River Tay from a different perspective in this adventure on the water.

They supply all the safety gear and take you on an adventure you’ll never forget. The activity takes place over a half-day of up to three hours. Experience Grade 2 and 3 rapids. The team refer to this river as ‘bouncy’ – sounds good to me!

Top Things To Do In Perthshire
Image Credit Highland Safaris

Book a safari on loch or land

Another one for Aberfeldy if you’re in the area. Safaris aren’t confined to Africa – you can book one with a truly Highland touch too.

There are mountain and forest options via the Highland Safaris and Red Deer Centre in the area. You could also try a biking or walking option or go all out and embark on a 4×4 off-road adventure. Oh, and yes, you can drive on that one if you want to see how good you really are off road!

Best Things To Do In Perthshire
Image Credit Scottish Crannog Centre

Visit a living museum at the Scottish Crannog Centre

Would you like to discover what living in this part of Scotland was like in the Iron Age? This living museum at the Scottish Crannog Centre gives you the opportunity to do just that. It’s dog friendly too – ideal if you’re on holiday with your pet.

You can hire a logboat and learn how Iron Age dwellers cooked their food and made clothes. You can also walk over the log bridge to the crannog itself. This was a common type of house built out over the loch. You can see this one built over Loch Tay, and it’s the highlight of the attraction.

Things To Do In Perthshire
Image Credit – Google Maps- Black Watch Castle and Museum

Explore the Black Watch Castle and Museum

If you’re visiting Perth for the day (the county town of the region), make time to visit the stunning Balhousie Castle. It’s confirmed as a five-star experience by the Scottish Tourist Board.

The famous Black Watch regiment is at the heart of the castle. Formed in 1739, you can follow the regiment’s history through the centuries since. The museum is filled with artifacts both old and modern. A tour helps you get the most out of your visit.

One quick tip, here – make sure you save time for a visit to the café. I’d certainly recommend a traditional afternoon tea. Finger sandwiches, scones, cakes, and pastries… mmm.

Why visit Perthshire Scotland
Image Credit Tay Forest Park

Choose a trail in Tay Forest Park

Scotland is dotted with several forest parks. Perthshire is home to the Tay Forest Park. There are eight locations to visit, with the Queen’s View Visitor Centre offering some of the finest views around.

If you only have time for one area, make it this one. It’s just a short walk from the car – only a couple of minutes – to reach the viewpoint. It can get crowded in peak season, but it’s worth the wait to reach the guardrail to see the view for yourself.

My pick if you have a few hours to spare is the Drummond Hill car park. You can pick up three separate trails from here, all waymarked. All are strenuous, requiring walking boots, but if you fancy a challenging hike over 5¾ miles, pick out the grey Caisteal MacTuathal trail.

This takes you right around the hill, offering superb views over Strathtay as you go. You’ll also encounter what’s left of an Iron Age fort. Glen Lyon is also laid out in front of you, so there are plenty of rewards along the way.

Why visit Perthshire
Image Credit Glenturret Distillery

Visit Glenturret Distillery

Scotland is known for its distilleries. Perthshire is home to a fair share of those. Glenturret might just be the oldest of them all. It has been going since 1775.

Located in Crieff, opening hours vary throughout the year, so check before you visit. They offer several tours that tell you more about whisky and how it’s made… and yes, you can try some along the way. This distillery is home to the Famous Grouse – one of the most famous whiskies around.

You can time your visit to coincide with exploring the lunch menu in the on-site café too. If the weather is good to you, enjoy your lunch or home-baked goodies on the terrace. Can you tell I have a thing for the cafés?

Perthshire Scotland Tourism
Image Credit Blair Castle

Explore Blair Castle

Perthshire offers lots of ways to learn more about the history of this part of Scotland. We’ve seen that with the crannog mentioned above. You can learn more from a visit to the captivating Blair Castle too.

Blair Castle has changed over the centuries, but the oldest part you can see today (Comyn’s Tower) has been there for over 700 years. You can explore 30 rooms inside, each telling stories about who lived there and what their lives were like.

As with many castles, the grounds and gardens are worth a visit on their own. While you can visit several distinct areas, the sculpture trail is a clear highlight. It takes you around the Hercules garden, where many statues and sculptures sit. They’re made from stone, lead, and marble. Finally, you’ll walk through St Brides Kirk and back to the start.

Perthshire Tourism
Image Credit Atholl Country Life Museum

Visit Atholl Country Life Museum

Blair Atholl is one of the most famous locations in Perthshire. It’s also home to this museum, which sits on the road between Blair Atholl and Bridge of Tilt. If you’re spending time at Blair Castle, you can walk to the Atholl Country Life Museum from there in less than five minutes.

Asking only a small amount for admission, the museum takes you back through the centuries. You’ll discover what rural life was like and what jobs people did. The local post office has been recreated, along with a stable, and various other buildings.

Visting Perthshire Scotland

Plan your trip to Perthshire today

One of the great things about Perthshire is that it has something for everyone to get stuck into. There are castles and museums for history buffs. Mountains for the hikers to tackle. Water sports for the water babies! And amazing views from many locations.

There are plenty of towns and villages to explore when all you want is some shopping, browsing, and perhaps a local afternoon tea. Perth itself offers a bit of everything, even some local walks including the Quarrymill Woodland Park just north of the city.

If you’re heading into Perthshire soon, make sure you plan to visit at least a couple of these destinations. You’ll be glad you did.

Author Bio

Graham lives in Glasgow, a 1.5 hour drive from Perthshire and visits monthly (or more). As Perthisre is the gateway to much of North and East Scotland, even when visiting further afield, Graham will often travel directly through Perthshire. His favourite place in Perthshire is Pitlochry.

And be sure to check out Food Wine Sunshine on Facebook, Twitter, Pinterest, and Instagram for travel destination ideas, healthy recipes, and more.

Tips For Pairing Wine with Meat, Game and Poultry

This post may contain affiliate links, please read our disclosure policy.

Here are basic Tips For Pairing Wine with Meat, Game and Poultry. These tips for pairing wine with meat will help you decide what wine to open. Red wines usually win, discover which ones.
Pairing Red Wine with Meat

Tips For Pairing Wine with Meat, Game and Poultry

There is no inappropriate venue for good wine. A good wine fits as well with barbecue as with the finest French cuisine. However, not all wines go with all foods. Which wine is chosen to go with which meat can make the difference between memorable meal and a not so memorable meal.  Wines are made to enhance your meal and dining experience.

The first thing to consider is the number of courses and how they will be served. For example, salads are generally served before the main course, unless it is a casual style meal such as a picnic. If you have two or more courses that will follow each other, each course should be paired with a different wine, with the most robust wine saved for the main course.

Most meat-based courses go best with dry or medium-dry wines. For richer, ‘meatier’ tastes, use red wines with strong berry notes, such as Zinfandel or Cabernet Sauvignon, rather than sweet wines. For sweet chutneys, honey garlic, and other sweet main courses, choose wines with just enough sweetness not to be overwhelmed. Save your sweetest wines for dessert.

Pair your wine to the dominant flavor, not the dominant food. Barbecued steaks, steak Oscar, and a screaming hot chili are all based on red meat, but the choice of wines is completely different. On the other hand, Zinfandel goes well with tomato-based barbecue sauces, no matter whether the meat is ribs, shrimp, or hamburgers.

For substantial salads with bacon or marinated shrimp or chicken, for the main dish with a little spice, or for a cheese-based sauce, try a Sauvignon Blanc, either on its own or as a blend. This wine also goes well with sushi.

For subtle flavors of herbs and light cheeses, especially with shrimp or grilled chicken, try a young, unoaked white wine, such as a Chardonnay. Chilean wines are particularly excellent to pair with these tastes. Slightly stronger flavors, such as a demi-glaze or au jus, might benefit from a semi-sweet rose, which complements the flavor of the natural steak juices without overpowering them.

How to pair wine with meat

For barbecued food, the dominant flavors come from the choice of seasoning. A robust Bordeaux, Merlot or Cabernet Sauvignon is excellent with the intense flavors of a hearty barbecued steak. A more subtle steak rubbed with peppercorns and sage will be enhanced by a Napa Valley Zinfandel. For strong tomato-based sauces, choose an acidic red with fruit or pepper notes. For the richest barbecued foods, try a Spanish Tempranillo.

Game meats are more robust than their domesticated kin. While this usually means using a more robust wine to match, this may result in too much, too close together. Instead, try a lighter Rhone wine or, for grilled or stuffed game birds, a Pinot Noir.

Tips For Pairing Wine with Meat

Whenever possible, try to match the geographic origin of the wine with the geographic origin of the food. Wines are heavily influenced by local soil and climate. The foods which developed in that part of the world naturally complement the local wines.

For a casual barbecue, buffet, or picnic, you probably want a couple of bottles of something that will go with everything. In this case, pair the wine to your main food, but keep it light. If the weather is hot, keep it even lighter. Some picnickers prefer to buy several single-serving bottles of wine and treat their picnic as a multi-course meal. If you want variety, choose one white wine and one red wine. As a general rule, plan for 2-3 glasses of wine per person, with about five glasses per bottle, with twice as much white wine as a red.

If you are looking for more wine pairing tips, here are the Food and Wine Pairing Basics.  If you serve seafood over the holidays (or anytime!) here are the tips for pairing wine with seafood.

Pairing Wine with Meat, Game and Poultry

I hope these tips for pairing wine with meat help you the next time you are looking for the perfect wine to go with dinner.

Be sure to check out Food Wine Sunshine on Facebook, Twitter, Pinterest, and Instagram for more wine tips, cocktails, healthy recipes, and fun things to do.

Peppermint Chocolate Ganache Thumbprint Cookies

This post may contain affiliate links, please read our disclosure policy.

Easy Peppermint Chocolate Ganache Cookies

These Peppermint Chocolate Ganache Thumbprint Cookies are the perfect holiday treat. This easy holiday cookie recipe is ready in 30 minutes and makes 36 cookies.

Peppermint Chocolate Ganache Cookies

Bring on the holiday baking! The holidays are filled with lots of sweet treats and desserts. Many host cookie swaps or cookie exchange parties over the holidays, this is a great way get a variety of holiday cookies without having to bake a bunch on your own. For your next holiday cookie swap, I recommend making my Peppermint Chocolate Ganache Thumbprint Cookies. This holiday cookie recipe makes about 36 cookies, so it’s perfect for sharing.

Made from scratch dough, decadent chocolate ganache, and peppermint. Oh I just love the combination of chocolate and peppermint over the holidays, like in my White Chocolate Peppermint Blondies, White Chocolate Peppermint Pie and my easy Peppermint Chocolate Chip Cookies.

Peppermint Chocolate Ganache Thumbprints

To make the dough for the cookies you will need basic pantry ingredients such as; flour, sugar, brown sugar, baking powder, salt and vanilla extract. From the refrigerator grab some butter and two eggs.

Peppermint Chocolate Ganache Cookie recipe

Making homemade chocolate ganache is actually really easy, you only need chocolate chips and heavy cream. It sounds fancier than it is 😉

The icing on the cake…well in this case the candy on the cookies, the peppermint is simply crushed peppermint candies. You can use candy canes if that’s what you have on hand.

How to make Peppermint Chocolate Ganache Cookies

My Peppermint Chocolate Thumbprints only require 10 minutes of prep time and about 12 minutes in the oven.

Peppermint Chocolate Ganache Cookies

In fact, these Peppermint Chocolate Thumbprints are so easy to make, the kids could help.

Tasty Peppermint Chocolate Ganache Cookies

Now, let’s get baking! Here is my Peppermint Chocolate Ganache Thumbprint Cookies recipe. Be sure to Print It and Pin It so that you can make it again and again.

Peppermint Chocolate Ganache Thumbprint Cookies

Peppermint and chocolate combined to make the perfect holiday cookie. Be sure to make these easy holiday cookies this season.
Prep Time10 minutes
Cook Time15 minutes
Course: Dessert
Keyword: baking, chocolate, christmas, cookies, desserts, easy recipes, holidays, peppermint
Servings: 36
Calories: 82kcal
Author: Tracy

Equipment

  • Stove
  • Mixer

Ingredients

  • 1 cup butter softened
  • 3/4 cup granulated sugar
  • 1/4 cup brown sugar
  • 2 eggs
  • 2 tsp vanilla
  • 1/2 tsp salt
  • 3 cups all-purpose flour
  • 1/2 tsp baking powder

Ganache

  • 3/4 cup chocolate chips semisweet
  • 3 tbsp heavy cream

Topping

  • 1/2 cup peppermint candies crushed

Instructions

  • Preheat the oven to 375°F
  • Using a mixer, mix the butter, brown sugar and granulated sugar together
  • Add the eggs, vanilla, and salt
  • Stir in the flour and baking powder gradually until a dough forms
  • Grab 1 tablespoon of dough and roll into a ball then flatten
  • Using your thumb, make a large indent in the cookies
  • Bake for about 12 minutes then let sit on the pan for another 5
  • Transfer to a wire cooling rack until completely cool

Ganache

  • Combine chocolate chips and heavy cream in a microwave-safe bowl and melt, 30 seconds at a time, until they are fully melted
  • Let the ganache rest for about 5 minutes, then drop a spoonful on each cookie
  • Top with crushed peppermint candies
  • Enjoy!

Notes

You can substitute the peppermint candies for candy canes.  I know most of us have candy canes laying around the house this time of year!

Nutrition

Calories: 82kcal | Carbohydrates: 16g | Protein: 2g | Fat: 1g | Saturated Fat: 1g | Cholesterol: 12mg | Sodium: 50mg | Potassium: 26mg | Fiber: 1g | Sugar: 8g | Vitamin A: 43IU | Calcium: 16mg | Iron: 1mg
Best Peppermint Chocolate Ganache Thumbprints

I hope you enjoy these Chocolate Peppermint Thumbprints as much as we do!

Best Peppermint Chocolate Ganache Cookies

These Peppermint Chocolate Ganache Cookies are best served with a tall glass of really cold milk. However, if you are like me and enjoy a nice glass of wine while baking or when eating dessert, I recommend pairing my Peppermint Chocolate Ganache Thumbprint Cookies with a glass of Cabernet Sauvignon. This dry red wine always pairs well with chocolate.

What is one of your favorite holiday cookies to bake? Do you love all things chocolate and peppermint too during the holiday season?

Chocolate Peppermint Ganache Cookies

Be sure to check out all the delicious recipes on Food Wine Sunshine and follow on me Facebook, Twitter, Pinterest and Instagram.

White Chocolate Peppermint Blondies

This post may contain affiliate links, please read our disclosure policy.

It’s time for holiday baking. My favorite holiday desserts have chocolate and peppermint, like these White Chocolate Peppermint Blondies. This dessert recipe makes 24 servings so it’s perfect for entertaining.
Peppermint White Chocolate Blondies

Peppermint White Chocolate Blondies

Christmas is coming, Christmas is coming! That means it’s time for baking delicious treats to share with family and friends. One of my favorite things about the holidays is al things peppermint. Peppermint Mocha at Starbucks. Peppermint pie. Peppermint cake. Peppermint cookies. Really, is there a better holiday dessert combination than chocolate and peppermint? Not in my book! We make a White Chocolate Peppermint Pie every Christmas and this year I decided I should add another white chocolate and peppermint dessert to our holiday menu. Hello White Chocolate Peppermint Blondies.

Easy Peppermint White Chocolate Blondies

I made everything from scratch, the blondies and the frosting. It’s easy! To make the Blondies you only need 8 simple ingredients, and you probably have all of them in your pantry and refrigerator right now. Well, maybe not the peppermint candies, but you may have some candy canes that you can use.

Best White Chocolate Peppermint Blondies

The frosting is also made with simple ingredients that you probably have on hand too.

Easy White Chocolate Peppermint Blondies

It only takes about 20 minutes to prep these delicious Peppermint White Chocolate Blondies, and you can have them ready to serve to guests in under an hour.

Tasty White Chocolate Peppermint Blondies

Bake time for my Peppermint White Chocolate Blondies is 20 minutes, then you just have to layer on that delicious frosting and sprinkle on some additional crushed peppermint candies. YUM.

Holiday White Chocolate Peppermint Blondies

This White Chocolate Peppermint Blondies recipe makes 24 servings, each serving is about a 2-3 inch square. I will openly admit that I can easily eat 2 😉

Christmas Peppermint White Chocolate Blondies

Ready to get baking? Here is my White Chocolate Peppermint Blondies recipe. Be sure to Print It and Pin It so you can make them several times this holiday season…and beyond.

Peppermint White Chocolate Blondies
Print Recipe
5 from 1 vote

White Chocolate Peppermint Blondies

These sweet treats are perfect for the holidays! Christmas calls for all things chocolate and peppermint and this easy dessert recipe is it. Perfect for entertaining and holiday parties.
Prep Time20 minutes
Cook Time25 minutes
Course: Dessert
Keyword: chocolate, christmas, dessert, dessert recipe, holidays, peppermint
Servings: 24 pieces
Calories: 178kcal
Author: Tracy

Ingredients

Blondies

  • 1 cup butter softened
  • 1 cup granulated sugar
  • 2 eggs
  • 2 tsp vanilla extract
  • 1/2 tsp salt
  • 2 1/4 cups all-purpose flour
  • 1/2 cup white chocolate chips
  • 1/2 cup peppermint candies crushed

Frosting

  • 2 cups powdered sugar
  • 1/4 cup butter softened
  • 1 tsp vanilla extract
  • ½ tsp peppermint extract or 4 drops peppermint essential oil
  • 2-3 tbsp heavy whipping cream
  • 1/2 cup peppermint candies crushed

Instructions

  • Preheat the oven to 350°
  • Grease 9×13 baking dish
  • In a large mixing bowl, combine butter and sugar, stirring on medium for about 3 minutes or until creamy
  • Add eggs, vanilla, and salt and mix until combined
  • Stir in flour, a little at a time, and mix on low until just combined, scraping the sides of the bowl as needed
  • Stir in the white chocolate chips and crushed peppermint
  • Spread the batter in pan and use a spatula to smooth it out
  • Bake for about 20-25 minutes, or until a toothpick comes out clean
  • Let blondies cool completely before removing from the pan
  • Meanwhile, in a medium bowl, combine the powdered sugar, butter, vanilla, and peppermint to make the frosting, beating on medium speed
  • Add in 2 tablespoons of heavy cream and check consistency
  • If frosting is not spreadable, add one more tablespoon of cream
  • Pull blondies out of the pan and spread the frosting on top
  • Sprinkle crushed peppermint on top
  • Cut into squares about 2-3 inches
  • Enjoy!

Notes

You can easily substitute candy canes for the peppermint candies. I know I always have a bunch of candy canes in the house this time of year.

Nutrition

Calories: 178kcal | Carbohydrates: 31g | Protein: 2g | Fat: 3g | Saturated Fat: 1g | Cholesterol: 18mg | Sodium: 72mg | Potassium: 58mg | Fiber: 1g | Sugar: 22g | Vitamin A: 59IU | Calcium: 27mg | Iron: 1mg

Holiday Peppermint White Chocolate Blondies

I hope you enjoy these White Chocolate Peppermint Blondies as much as we do!

Peppermint White Chocolate Blondies Close Up

They are best with a tall glass of really cold milk, but if you are like me and enjoy a nice glass of wine with dessert, I recommend pairing my Peppermint White Chocolate Blondies with a nice glass of Cabernet Sauvignon.

How to make Peppermint White Chocolate Blondies

What is one of your favorite holiday desserts? Do you love all things white chocolate and peppermint this time of year too?

Peppermint White Chocolate Blondies Recipe

Be sure to check out all the delicious recipes on Food Wine Sunshine and follow on me Facebook, Twitter, Pinterest and Instagram.

11 Delicious Leftover Turkey Recipes

This post may contain affiliate links, please read our disclosure policy.

Everyone loves a delicious holiday dinner complete with a roasted turkey. However, we often end of with turkey leftovers. Here are some of the best recipes to use up that leftover turkey.

Easy Leftover Turkey Recipes

11 Delicious Leftover Turkey Recipes

Serving a turkey dinner is a holiday tradition for many. However, that perfectly roasted turkey many times leaves us with an excessive amount of leftover turkey.

Even the most delicious roast turkey dinner, can leave you with the problem of leftovers, Everyone knows that using up turkey leftovers makes economic sense, but it can be a struggle to make them appetizing.

Here are some quick, easy, and tasty leftover turkey recipe ideas for snacks and lunches which will use up that leftover turkey but leave the memory of the big roast turkey dinner far behind.

Speaking of holiday dinner leftovers, if you have some leftover cranberry sauce, be sure to make this Cranberry Jello Salad.

Chinese Style Turkey Wraps

Ingredients:

tortilla wraps
strips of leftover turkey breast and a turkey leg
hoisin sauce
celery, cut in thin 2-inch strips
green onion, shredded length-wise in 2-inch strips
cucumber, cut in thin 2-inch strips
lettuce, shredded

Cooking Instructions:

Spread the tortilla wrap with hoisin sauce
Lay on some strips of turkey
Add thin strips of celery.
Add thin strips of cucumber.
Add shredded green onion or spring onion.
Top with shredded lettuce
Season with salt and pepper to taste and roll up the wrap

Best Leftover Turkey Recipes

Mexican Style Turkey Wraps

Ingredients:

tortilla wraps
strips of leftover turkey breast and a turkey leg
avocado, chopped
sour cream
tomatoes
salsa
cheddar cheese, grated
black beans
yellow rice, cooked
lettuce, shredded

Cooking Instructions:

Spread the tortilla wraps with salsa
Lay on strips of turkey
Add some sour cream.
Add chopped avocado, tomatoes, black beans, rice
Sprinkle with grated cheese
Top with shredded lettuce
Season with salt and pepper to taste and roll up the wrap

Turkey Wraps With Apple and Blue Cheese

Ingredients:

tortilla wraps
strips of leftover turkey breast and a turkey leg
mayonnaise
blue cheese, crumbled
apple, peeled and chopped
mustard
lettuce, shredded

Cooking Instructions:

Mix two tablespoons of mayonnaise with a teaspoon of mustard
Spread mayonnaise and mustard mix overwrap
Lay on strips of turkey
Add chopped apple
Sprinkle on crumbled blue cheese
Top with shredded lettuce
Season with salt and pepper to taste and roll up the wrap

Recipes ideas for leftover turkey

Turkey Omelette

Ingredients:

6 eggs
strips of leftover turkey breast and a turkey leg
1 onion, chopped
1 clove of garlic, chopped
2 oz cheddar cheese, grated
1 large tomato, sliced
1 tbsp butter or oil

Cooking Instructions:

Beat eggs
Heat butter or oil in a frying pan
Fry onions gently until soft.
Add garlic and turkey strips and cook until turkey is well heated through.
Pour eggs over and shake the frying pan to distribute the mixture evenly.
Cook until eggs are set
Arrange tomatoes on top and place under broiler or grill until top begins to firm up
Remove from broiler or grill.
Season with salt and pepper to taste
Sprinkle cheese over top
Put back under broiler or grill and cook until cheese starts to bubble.
Serves 4 (or 2 hungry people) with salad for a light lunch

Spicy Turkey Pizza

Ingredients:

ready to bake, pizza base
strips of leftover turkey breast and a turkey leg
tomato puree
1/2 tsp hot pepper (jalapeno, chili) paste
oregano
2 fresh tomatoes, sliced
1 bell pepper, sliced
8oz cheese, mozzarella or cheddar, grated

Cooking Instructions:

Mix Tomato puree with hot pepper paste, oregano, and salt and pepper
Spread over the pizza base
Arrange strips of turkey over the pizza base
Layer tomato and red bell peppers over top of the turkey
Sprinkle cheese over top
Bake according to instructions on the pizza base

Ways to use leftover turkey

Here are 6 more Delicious Leftover Turkey Recipes:

How long is leftover turkey good for in the refrigerator?

You can leave leftover turkey in the refrigerator for about 4 days.

How long is leftover turkey good for in the freezer?

You can leave leftover turkey in the refrigerator for about 3 months.

Delicious Leftover Turkey Recipes

What is one of your favorite ways to use turkey leftovers?

Be sure check out all my healthy lifestyle tips and recipes and follow me on Facebook, Twitter, Pinterest, and Instagram.

DIY Christmas Wine Glass Candle Holder

This post may contain affiliate links, please read our disclosure policy.

This Christmas Wine Glass Candle Holder is easy to make and a festive holiday decoration. This easy Christmas craft is also a great Christmas gift idea.

DIY Christmas Wine Glass Candle Holder

DIY Christmas Wine Glass Candle Holder

If you’re looking for the perfect DIY gift this Christmas, you’ve come to the right place! There are so many creative ways to show your friends and family how much you care without breaking the bank.

I am not always the most crafty person in the world, but if it involves Christmas and wine it’s one that I will enjoy. It’s actually been a few years since I made my Christmas Mason Jars, so I decided a new Christmas craft was due. And these Christmas Wine Glass Holders are perfect!

Easy DIY Christmas Wine Glass Candle Holder

These festive Christmas Tree Wine Glass Candle Holders only take about 20 minutes to make and you can get most of the supplies at the dollar store. So, it’s also an inexpensive Christmas craft. In fact, this Christmas Tree Wine Glass Candle Holder craft would also make for a thoughtful and useful Christmas gift. You don’t have to be a wine lover to appreciate a Christmas-themed candle holder. But, come on…who isn’t a wine lover?! If you are looking for additional gift ideas for wine lovers, be sure to check out this great list of gift ideas for wine lovers.

Why do people like DIY gifts?

Do you have that one friend who is always showing off their latest DIY project? If so, you’re not alone! Everyone loves a creative and unique gift, and homemade presents often hold a special place in our hearts. DIY gifts—or do-it-yourself gifts—are a great way to show someone how much they mean to us without breaking the bank.

So why exactly are DIY gifts so popular? Well, for one thing, they allow us to express ourselves more freely than buying something from the store. When making something from scratch, we can include personal touches like custom colors or messages that make the gift even more meaningful. We also get the satisfaction of being able to say “I made this just for you!” Like these DIY Wine Glass Candle Holders!

Christmas Wine Glass Candle Holder Craft

I did use wine glasses that I got from the dollar store for this Christmas Tree Wine Glass Candle Holder craft, I decided since we were decorating them, it didn’t matter if they were red, white or rose wine glasses 😉

Speaking of wine glasses, how about you grab a glass of wine and let’s get creating!

To make a Christmas Tree Wine Glass Candle Holder you will need these supplies:

Wine Glass – purchased at Dollar Tree
Green Flocked Bottle Brush Tree – purchased at Dollar Tree
Iridescent Faux Snow – purchased at Dollar Tree
Batting – purchased at Dollar Tree
Wood Slice – purchased at Hobby Lobby
White Chalk Paint – purchased at Walmart

Easy Christmas Wine Glass Candle Holder Craft

Tools need to make your Christmas Tree Wine Glass Candle Holder:

Sponge Paint Brush – purchased at Dollar Tree
Mod Podge – purchased at Dollar Tree
E6000 Glue – purchased at Hobby Lobby.  *You can substitute hot glue if you prefer, see tip below if using hot glue.
Q-tip

If you are an avid crafter, you may actually have some of these supplies and tools in your crafting room already.

Ok, so if you have 20 minutes to spare, let’s start making our DIY Christmas Wine Glass Candle Holder.

How To Make a Christmas Wine Glass Candle Holder:

Step 1

Christmas Tree Wine Glass Candle Holder

Using a sponge paint brush, cover the base of the wine glass with Mod Podge.

Christmas Tree Wine Glass Candle Holder Craft

Pour the faux snow on top to cover, then shake off the excess.

DIY Christmas Tree Wine Glass Candle Holder

Next, paint the stem with Mod Podge. Hold your glass sideways and pour the faux snow over it while rotating the glass to cover all sides.

Easy DIY Christmas Tree Wine Glass Candle Holder

Lastly, stand the wine glass upside down and paint bowl area around the stem and include a few dips down the bowl to mimic snow falling down the glass. Pour faux snow over the upside down glass to cover the Mod Podge. Shake off any excess snow.

Step 2

Festive Christmas Wine Glass Candle Holder

Paint the top and edges of the wood slice with white chalk paint. Let dry (approximately 10 minutes).

Step 3

Festive Christmas Tree Wine Glass Candle Holder

Use a dab of E6000 Glue on the bottom of the mini bottle brush tree and place it in the center of the wood slice.

Step 4

Pull apart a small bunch of batting material. Add 3 small dabs of glue to the wood slice and arrange the batting material to cover the area around the bottle brush tree. Sprinkle the batting with a few pinches of faux snow.

Christmas Wine Glass Candle Holder

Step 5

Add glue to the rim of your wine glass. I used a q-tip to easily cover the rim of the glass with glue. Turn the wine glass upside down and place it on to the wood slice. Remove any batting material that sticks out from under the glass by pulling it or you could probably use scissors to snip any excess strands.

Holiday Wine Glass Candle Holder

Tips for making your Christmas Tree Wine Glass Candle Holder:

Hot Glue can be substituted for the E6000 Glue. Hot Glue will adhere faster where as the E6000 glue allows you to move items for a few minutes to make sure everything is in the right place.

Holiday Wine Glass Candle Holder Craft

The faux snow will flake off if touching it often. You can seal it with a spray on acrylic sealer or adding another coat of Mod Podge. If using Mod Podge, wear a pair of latex gloves and dab the Mod Podge over the faux snow with your finger. I tried using the sponge paint brush and it took off more faux snow than it sealed. I ended up just dabbing Mod Poge over it with my fingers, but it was time consuming so I only sealed a small portion. I would suggest trying a spray acrylic sealer.

Easy Holiday Wine Glass Candle Holder Craft

I hope you enjoy your new Christmas Wine Glass Candle Holder as much as we do!

DIY Holiday Wine Glass Candle Holder

Have you ever made a Christmas craft with a wine glass before?

Be sure to follow me on Facebook, Twitter, Pinterest, and Instagram for more holiday fun and helpful tips.

How To Store Wine At Home

This post may contain affiliate links, please read our disclosure policy.

Now that you have invested in a couple bottles of your favorite wine, you have to know How To Store Wine At Home. Proper wine storage is essential to your wine tasting it’s best.
How to store wine

How To Store Wine At Home

If you enjoy wine and want to store a few bottles or maybe you stocked up on some wine for holidays, I’m pleased to tell you that you don’t require a huge vaulted maze under the house to do it. However that would be really cool.  Whether you are a beginner to buying wine or you have your own wine cooler already, these tips should guide you on how to store wine at home. Maybe you have an old outhouse or storeroom somewhere that already fits the bill, which would also be pretty darn cool.  However, the rest of us make to make due with what we have.

Any space where the atmosphere is humid and the temperature is stable and fresh will do, as long as you follow a few basic rules.

How To Store Wine

General Conditions

The space you choose should face north or east, so it is protected from the sun, and the temperature is fairly constant.

The area should be well-ventilated and not susceptible to vibrations of any kind. Keep your store away from the family workroom if you use a lot of power tools or you mend your garden machinery there.

The walls should be well-insulated. Old houses usually have lovely thick walls, but you will have to provide extra insulation if the walls are rather thin. You may need to insulate the door as well.

The most important thing here to remember when storing wine at home is that the wine shouldn’t be in the sun, the wine should be kept in the dark, and do your best to keep it in a cool area.  If you have a wine cooler, that’s great! Most wine coolers have a red wine and a white wine setting, so it helps takes the guess work out of the perfect temperature.

Temperature

To allow your wine to age at the correct speed, that is, neither too quickly nor slowly, it should be stored at a temperature of between 50 and 60 F.

Even in the summer months, it’s necessary to keep the temperature below 20C.

Lighting

Keep your lighting inside the area subdued, just light enough to read the labels on the bottles.

Fix light switches outside the door because of the high level of humidity inside the store. You may need to buy fittings designed for exterior use.

Humidity

The ideal humidity for storing wine is around 70% to 80%. This prevents the corks from drying out but will keep any mold growth to a minimum.

Storage

Store the wine on its side to prevent the corks from drying out.

Racking systems can be made from a variety of materials, even simple wooden boxes, if the wine isn’t going to be stored for generations to come.

If you are really serious, however, and intend to leave your wine collection as part of your children’s inheritance, the bottles should be stored in more durable materials such as terracotta, or lightweight concrete.

Whatever type of racking you choose, make sure it is securely attached to the walls.

Stacking bottles on top of each other saves space, but only do this if they are identical; otherwise, you’ll be shaking the wines up when you’re looking for the particular bottle you want.

For true wine connoisseurs, there seems to be a traditional hierarchy in the shelving, though I’m not sure of the reasons for this: champagnes and sparkling wines nearest the floor, then dry whites, then sweet whites, which are followed by rose, then young reds, and last of all vintage reds at the top.

Floor

If you happen to have a wine cave or a basement that you can turn into a wine cellar, you may take advantage of the floor for wine storage. The ideal floor for a wine storage area is one that can breathe. This is why old outhouses are ideal for the job. They don’t have damp proof courses and are more likely to have a simple floor of compressed earth.

It is possible to cover the floor with gravel which you can water from time to time, but if you’re more concerned about the look of the place because of possible visitors, the floor could be covered with natural tiles laid on a bed of mortar.

If what you have is a wine rack that you bought at the local home goods store, that will work as well. Just remember to keep your wines out of the sun and do your best to keep them in a temperature controlled environment.

How To Properly Store Wine At Home

Be sure to check out Food Wine Sunshine on Facebook, Twitter, Pinterest, and Instagram for more wine tips, cocktails, healthy recipes, and fun things to do.

Top 10 Free Things To Do In Barcelona

This post may contain affiliate links, please read our disclosure policy.

Whether you live in Barcelona Spain or are visiting on vacation, be sure to add these Top Free Things To Do In Barcelona to your travel itinerary.
Best Free Things To Do in Barcelona

10 Top Free Things to do in Barcelona

Best free things do see and do when visiting Barcelona

Whether you’ve never traveled to Barcelona or have actively made it your go-to Spanish hub for summer vacations, there is never a shortage of things to see or do in the city. Traveling to Barcelona is not the cheapest travel plan though, since it’s one of the most visited places in the world and the prices tend to skyrocket the warmer the weather becomes.

Luckily, there are a variety of exciting free things to do in Barcelona that will have you living la vida loca at no charge whatsoever. No matter where your interests lie, either on a sunny beach or in the coolness of a cultural museum, this guide has got you covered. This guide is brought to you by Marco Santos from Travel-Boo, who has traveled through Spain and is sharing his experiences and favorite free things to do in Barcelona.  So, grab a glass of Spanish wine and start dreaming of your next Barcelona adventure.

So, whether you’re traveling to Barcelona for only a day or two, or plan to stay even longer, make sure to add these awesome free things to your Barcelona travel Itinerary!

1. Head to Fontana Magica for sunset

Translated to the Magic Fountain, this work of art was designed in 1929 for the International Exhibition and is Barcelona’s largest fountain. Every weekend night just after sunset, the fountain puts on two 20-minute spectacles of ever-changing lights and cascading water where the two mediums intertwine accompanied by music, undoubtedly one of the best things you can do in Barcelona by night

Find Fontana Magica right in front of the MACBA (Barcelona Museum of Contemporary Art), which offers a spectacular view of the city. The fountain show is entirely free so make sure to arrive early to beat the crowds and snag a spot in the front row. Just don’t be surprised if you get a little wet though, it’s totally worth it!

2. Go on a free walking tour

What’s better than a free walking tour to not only get you acquainted with a new city but also provide you with useful information while seeing all the most popular monuments? If you’ve never tried a free walking tour, this is your chance, as guided tours are typically run by official tour groups yet cost absolutely nothing. Walking tours are the best way to get to know a place as you can learn historical tidbits while never having to worry about getting lost.

At the end of a normally 2-to-4 hour tour, it is recommended to give your guide a fair tip but you’re under no obligation to! There are several wonderful walking tours available in Barcelona but the highest-rated operators are Sandemans New City Tour, Runner Bean Tours, and Barcelona Street Style Tour. Make sure to bring your comfiest shoes so tired feet won’t distract you from all the beauty. 

3. Sunbathe at the beach

If you’re looking for a bit of fun and sun, then Barcelona’s the perfect place to get some rays while being just minutes away from the city center. With nearly 5 kilometers of beachfront, golden sands, and clear Mediterranean waters, there should be nothing holding you back from diving headfirst into this adventure.

Barcelona has a total of 9 beaches and the most popular are Barceloneta, Bogatell Nova Icaria, and Mar Bella Beach. Barceloneta is the closest beach to the city center, merely a short walk or metro ride away, yet the others are just as easily reachable via the city’s excellent public transportation. Try to make a day of it so you can spend as much time basking in the Mediterranean sun as possible. Just don’t forget the sunscreen!

Top Free Things To Do in Barcelona
Parc de la Ciutadella

4.  Have a picnic at Parc de la Ciutadella

If stunning architecture, lush gardens, and glistening waterfalls are more your thing, then you’ll fall in love with the idyllic charm of this large park. What’s more, the park’s grounds feature a myriad of attractions such as the Catalan Parliament, a zoo, a castle beset by 3 dragons, and a tropical greenhouse; as well as the aforementioned waterfall. 

Free Things To Do in Barcelona
Parc de la Ciutadella – Catalan Parliament

For such a heavenly place, you might be surprised that the park had its origins as first a citadel and then as a jail for political prisoners. Now it sits as a local meeting hub and is one of the most picturesque places in Barcelona to have a picnic. You can even rent a boat to row across its massive lake. You won’t be disappointed so take a snack or two and then kick back in the splendor of it all.

5. Haggle the day away at a local flea market 

What’s nearly as good as getting something for free? Getting something for a steal after haggling for it. If you’re an avid bargain-hunter, you’ll appreciate Barcelona’s wide selection of markets, from culinary delights to apparel to decor. While this activity isn’t exactly free, you can at least try to get a discount on any trinket or souvenir that catches your eye. 

For the best bargains, head to Encants market, one of the biggest markets in Europe. It has been around since the 14th century, also making it one of the oldest. Saturdays are the busiest days so get there by 7 AM to make the first auction and find the most well-hidden gems away from the crowds. The second auction is around noon but there are copious markets you should put on your shortlist, such as Flea Market on Sunday mornings and its prodigy Fleadonia on the first Sunday of the month. You’ll be amazed by whatever you just so happen to unearth. 

Top Free Things To Do in Barcelona Spain
La Sagrada Familia

6. Take yourself on an architectural tour of Gaudí’s buildings

If you’ve never heard of Antoni Gaudí, he was the Catalan architect behind some of Barcelona’s most iconic monuments such as La Sagrada Familia and Plaça Reial. Renowned for his unique Modernisme style, his legend has only grown in more recent years, so do yourself a favor and get to know his masterpieces. There are several must-sees, such as:

  • Casa Milà
  • Casa Batlló
  • Casa Vicens Gaudí
  • Casa Calvet
  • Güell Palace
  • Park Güell
  • Church of Colònia Güell
  • Teresian College

Unfortunately, not all of these places are free to enter, but that shouldn’t stop you from at least dropping by to get an eyeful of their avant-garde architecture. You won’t regret it! 

7.  Journey around Joan Miró’s public artwork

Yet another notable artist from the city, Joan Miró is one of the most prestigious Spanish surrealists of the 20th century and, therefore, a local celebrity. Though Miró had a love-hate relationship with his hometown, he still left several works of art behind to commemorate his childhood and long-running affection for Barcelona.

Find the first artwork as soon as you fly into the airport when you spot Mural de l’Aeroport, a colorful, ceramic mural located in Terminal 2. If arriving by sea, check out Miró’s four mosaic circles on Pla de l’Os as you walk up the port and head toward La Rambla. His best work, however, might be his contributions to Park Joan Miró, where nature meets culture just as he always intended.

8. Wander around a museum offering free admission

If you’re an art lover or history buff, you might be distraught to hear that most of the state-owned museums come with an entrance fee. Still, several prominent museums do offer free admission during specific time slots so you don’t have to shell out even more in this not-so-cheap travel destination.

If you’re dying to see Las Meninas by Pablo Picasso (the original by Diego Velazquez is in Madrid) but don’t want to fork out €20, then make sure to get there early to get a good spot in line as you won’t be the only one jonesing for a free peek.

Free Museums in Barcelona on Sundays:

Free Museums in Barcelona on the first Sunday of the month:

Free Museums in Barcelona on other days of the week:

If you’re savvy enough, you can try to time your vacation days to coincide with a weekend so that you can take advantage of all the arts and culture on offer for no extra cost. Now, who could argue with that?

Best Free Things To Do in Barcelona Spain
The Cathedral of the Holy Cross and Saint Eulalia

9. Say a prayer at a Roman Catholic cathedral

If there’s anything that Europe is famous for, it’s the endless sea of cathedrals that can be seen cresting its skyline. Barcelona is chock full of them and, although not all have free admission, many of them charge no fee to enter and marvel at their beauty. The most exquisite cathedrals in the area are typically open to visitors throughout the week, but they may be closed on Sundays for mass unless you plan to worship. 

At the top of your list should be both Santa Maria del Mar and Santa Maria del Pi Basilicas, as well as Saint Eulalia & the Holy Cross Cathedral and Sant Just I Pastor Basilica. Why not go to see the intricate architecture and then stay to light a candle for €1? All proceeds go to maintaining the cathedrals’ facilities, and you bet that your karma points will go through the gilded roof.

10. Meander around Montjuïc

This hilltop undoubtedly has one of the most impressive vantage points in Barcelona and makes for a terrific place to watch the sunset over the city’s skyline. It’s named after the medieval Jewish community who once resided there (you can still visit their cemeteries), and has been a strategic point in the city since then.

Its hilltop fortress, the Castle of Montjuic, dates back to the 17th century and, in 1929, many additional monuments were contributed for the International Exposition, including the National Palace, the Olympic Stadium, and the Magic Fountain. You can also visit the Joan Miró Foundation there along with some botanical gardens to make the perfect afternoon of sights and sun. Don’t be surprised if you never want to leave.

Barcelona is the ideal destination for anyone who craves an eclectic combination of culture, arts, and golden beaches, with more activities to partake in than you can shake a churro at. Regardless of what draws you to Barcelona, you can rest assured that you’ve ticked the most popular attractions off your bucket list when looking for the best free things to do. Now relax and try the tapas and enjoy a glass of wine!

Have you been to Barcelona Spain? What is one of your favorite free things to do in Barcelona?

Top Things To Do In Barcelona

Author Bio:

Marco from Travel-BooBorn and raised in South Africa, Marco Santos from Travel-Boo, together with his partner moved to sunny Lisbon over 3 years ago. With an absolute love for Europe, he is on a mission to rediscover his own Portuguese heritage along the way. Marco has set out to blog and share his passion for traveling through and exploring both Portugal, Spain and throughout Europe, through his blog Travel-Boo.

Find more of Marco’s travels online and be sure to follow him on Facebook, Pinterest and Twitter .

And be sure to check out Food Wine Sunshine on Facebook, Twitter, Pinterest, and Instagram for travel destination ideas, healthy recipes, and more.

Follow Me!